

Welcome to the ultimate BMW X3 community.
| 02-25-2019, 09:40 PM | #1 |
|
The limit of adhesion is my home.

1702
Rep 3,778
Posts |
Wireless Charger Retrofit: Success! :)
First off, thank you forum member "fw_fw" for posting this on a previous thread. I ordered it after i saw some of the install pics
 (page 34, post#734) (page 34, post#734)https://x3.xbimmers.com/forums/showt...harger&page=34 This is where I bought it: https://www.aliexpress.com/item/DNHF...461045d0rvPQIr Tools required: - Pry tool (plastic preferred, but used a metal one and was gentle) - 5 star screw head, Torx (not sure what size but one of the smaller ones) - Patience and about 30 min of your time. Process: - Before reading my little tidbits of info, read the link above from where I purchased it, it has very descriptive pictures. - There are 4 "pry points", but you can edge your way up towards the HVAC facia, starting from the armrest area. Comes off SUPER easy. No need for any force whatsoever. - When you lift the cover up there are 3 plugs....navigation, park brake & drive modes. You won't need to mark them since they are all color coded, BLUE-BLACK-RED and they won't accidentally fit in any other connector. Remove them slowly (DON'T pull the wires and use a tool to pull the plastic plugs). - When you take off the cover set it aside and remove the 4 Torx screws - Then remove the existing rubber panel in the cubby first. It looks like this when removed: 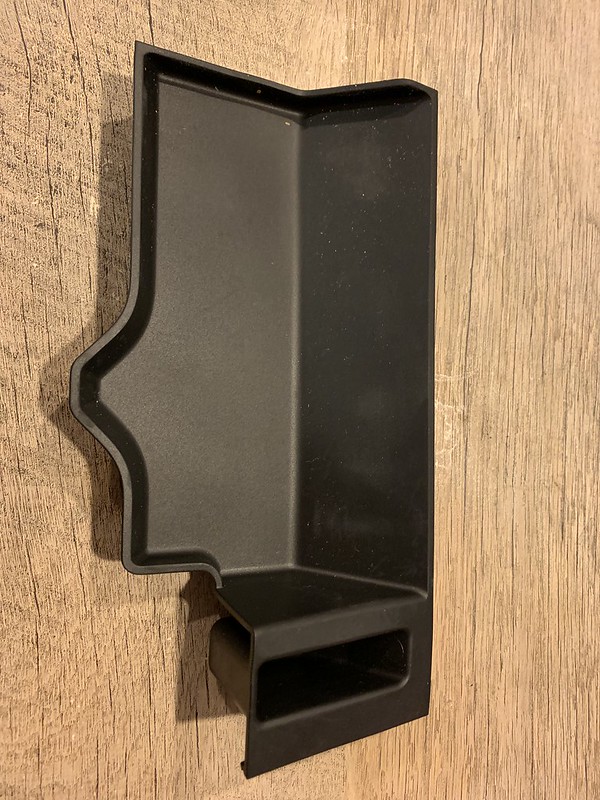 IMG_4545 by P LL, on Flickr IMG_4545 by P LL, on Flickr- Then when you lift up the bottom section, after removing the torx screws, do it slowly...starting from the rear and pull towards you gently - pull the shifter towards you to get it UP (not off) easy. There WILL BE 2 Bigger cords connected to the section - no need to remove them, just loosen the "wire guides" a little so you can lift the panel higher up by just a bit (about 4 to 5 inches of give) DO NOT remove the clips holding the wires, no need. - When you install the Wireless Panel, run the wire through the left hole all the way and pull the cord CLOSE to the RIGHT edge of the hole. You will need to do this so that the plastic clips can secure themselves to the outer edges of the holes properly. It take a little "massaging" but you'll figure it out. I just positioned - and then pushed till I heard two clicks, one for each hole. Here is the rear of the original trim piece to give you an idea of how big the holes are and what you might need to do to get the plastic clips through them: 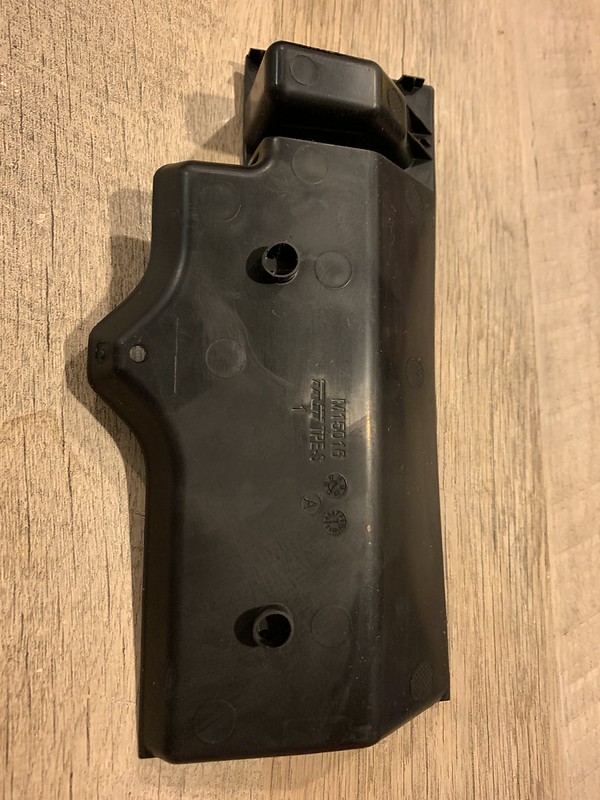 IMG_4546 by P LL, on Flickr IMG_4546 by P LL, on FlickrAnd this is the center Console with the wire-tap-connector-adapter installed (no tapping, just plug and play) - on the RIGHT is the "connector" to the stock plug, then on the bottom of the pic is the Black fuse box, and in the middle you'll see the TWO white connectors that complete the circuit: 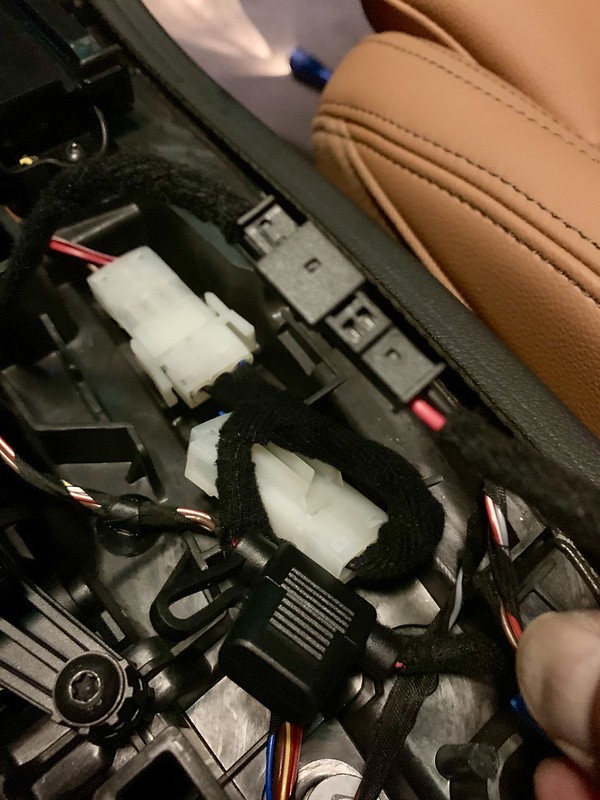 IMG_4539 by P LL, on Flickr IMG_4539 by P LL, on Flickr- Then install the 4 Torx screws again and TEST the charger by putting your phone on it.....turns blue....boom. You're golden. - Slowly connect the 3 plugs for the console - BLUE, BLACK & RED. Then just gently push it back down (about 6 points). - Done: 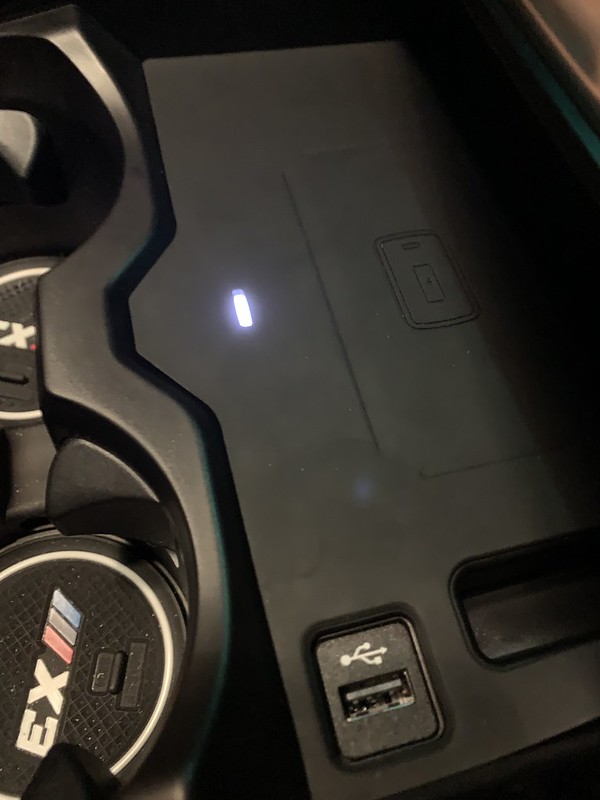 IMG_4542 by P LL, on Flickr IMG_4542 by P LL, on Flickr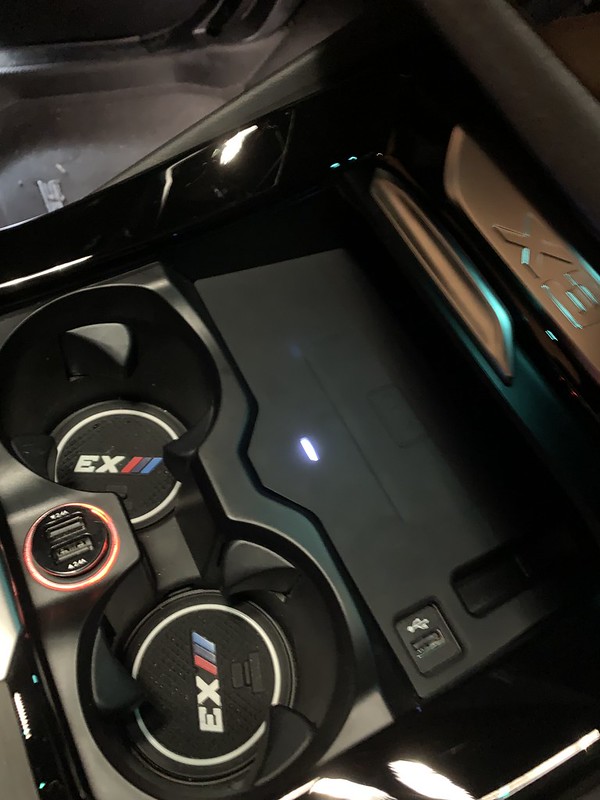 IMG_4541 by P LL, on Flickr IMG_4541 by P LL, on FlickrKindly excuse my "X3 Cup holder rubber trays" HAHAHAHA  Hope this helps all of you without the OEM wireless charger figure out a better solution!  Let me know if you have any questions I can help with! Let me know if you have any questions I can help with!
__________________
2019 X3 xDrive30i Glacier Silver | Cognac w/ Fine Cove | MSport | Premium | Dynamic Handling PKG | Drive Assist | HK w/ Bavsound Upgrade |
|
|
Appreciate
16
AnOldBiker270.00 BuddhaTB150.00 JustChris17485.50 fw_fw107.50 MechX3M40i1006.00 Dutch157686.00 Ragnarkov126.50 ZHPsedan135.50 IM_ALL_IN57.00 pej744593.00 Day Laborer1746.00 Pumice991.50 weez271.50 malbec10.00 DocWho86.50 ILLMATIC2313.50 |
| 02-25-2019, 10:31 PM | #3 | ||
|
The limit of adhesion is my home.
1702
Rep 3,778
Posts |
Quote:
Quote:
__________________
2019 X3 xDrive30i Glacier Silver | Cognac w/ Fine Cove | MSport | Premium | Dynamic Handling PKG | Drive Assist | HK w/ Bavsound Upgrade |
|
||
|
Appreciate
0
|
| 02-26-2019, 05:15 AM | #5 | |
|
Freude am Fahren
108
Rep 278
Posts |
Quote:
For further reference here is my install thread that SROC3 is referencing. My charger has been installed almost a month now and is still working flawlessly! https://x3.xbimmers.com/forums/showthread.php?t=1581849
__________________
 Current: 18 X3 xDrive30i Past: 03 530i Sport | 06 330ci ZHP | 14 X1 xDrive35i M-Sport | 11 328i M-Sport | 98 M Roadster |
|
|
Appreciate
1
SROC31702.00 |
| 02-26-2019, 07:50 AM | #6 | |
|
Private
 86
Rep 61
Posts |
Quote:
Nice job SROC on the install! |
|
|
Appreciate
0
|
| 02-26-2019, 08:01 AM | #7 |
|
Enlisted Member
 
5
Rep 46
Posts
Drives: 2019 X3 s30i
Join Date: Aug 2018
Location: Tampa, Florida
|
Nice write up! I have been debating this mod but wanted to wait and see how they held up over time. Sounds like I'll be giving this a shot very soon.
|
|
Appreciate
0
|
| 02-26-2019, 10:39 AM | #9 | |
|
Captain
 603
Rep 891
Posts |
Quote:
|
|
|
Appreciate
0
|
| 02-26-2019, 12:20 PM | #10 |
|
First Lieutenant

127
Rep 304
Posts
Drives: 2018 X3 i30xdrive
Join Date: Nov 2017
Location: Maple Ridge, BC
|
This is one of the few interior mods I want to do to my car. seems pretty straight forward.
while under the console cover, did you happen to see if there was any wiring that might lead to a usb port in the center cubby? or perhaps another power cord that would be running to the back of the console (for a power port). if I can get a power port at the back of the console, that would be crazy awesome. |
|
Appreciate
0
|
| 02-26-2019, 01:14 PM | #11 | |
|
The limit of adhesion is my home.
1702
Rep 3,778
Posts |
Quote:
__________________
2019 X3 xDrive30i Glacier Silver | Cognac w/ Fine Cove | MSport | Premium | Dynamic Handling PKG | Drive Assist | HK w/ Bavsound Upgrade |
|
|
|
Appreciate
0
|
| 03-11-2019, 08:26 PM | #12 | |
|
Captain
603
Rep 891
Posts |
Quote:
|
|
|
Appreciate
0
|
| 03-11-2019, 08:38 PM | #13 | |
|
The limit of adhesion is my home.
1702
Rep 3,778
Posts |
Quote:
DO NOT force. Wiggle, wiggle and they should come off. I'll be around for the next hour or so....so you're welcome to text me for steps if you get stuck. Messaged you my mobile
__________________
2019 X3 xDrive30i Glacier Silver | Cognac w/ Fine Cove | MSport | Premium | Dynamic Handling PKG | Drive Assist | HK w/ Bavsound Upgrade |
|
|
|
Appreciate
1
pej744593.00 |
| 04-19-2019, 06:37 PM | #15 | |
|
The limit of adhesion is my home.
1702
Rep 3,778
Posts |
Quote:
NOTE - this only fits cars with NO standard wireless charger in place. Otherwise the placemat will not fit
__________________
2019 X3 xDrive30i Glacier Silver | Cognac w/ Fine Cove | MSport | Premium | Dynamic Handling PKG | Drive Assist | HK w/ Bavsound Upgrade |
|
|
|
Appreciate
0
|
| 05-09-2019, 06:20 PM | #16 |
|
Registered
2
Rep 1
Posts |
Tried to install one of these today.
The wire tap connector they sent was a 2 pin vs the 3 pin that is required (and was shown on the aliexpress listing page). I've sent the seller a message and will file a dispute in 24 hours if they don't agree to send he correct part, but as a backup does anyone know if this can be purchased on its own anywhere? |
|
Appreciate
1
SROC31702.00 |
| 05-19-2019, 02:31 AM | #17 | |
|
The limit of adhesion is my home.
1702
Rep 3,778
Posts |
Quote:
__________________
2019 X3 xDrive30i Glacier Silver | Cognac w/ Fine Cove | MSport | Premium | Dynamic Handling PKG | Drive Assist | HK w/ Bavsound Upgrade |
|
|
|
Appreciate
0
|
| 05-25-2019, 08:50 PM | #18 |
|
Registered
2
Rep 3
Posts |
I installed mine today. The blue connector right underneath the iDrive wheel was a pain in the ass to disconnect. We had to wedge a tiny flat screwdriver in there and then pull really hard to get it to come out. Other than that, the install was fairly straight forward. Thank you to SROC3 for the detailed instructions! Mine turns green when it's charging.
|
|
Appreciate
1
SROC31702.00 |
| 05-26-2019, 07:55 AM | #20 |
|
Stay Tuned!
297
Rep 390
Posts |
This is A GREAT write up. Well done.
I have the charger from the factory. A word of warning in case you are adding this and expecting amazing charging. Mine is extremely finicky. I have driven for 6 hrs and gotten very little charge (ie it keeps up, but only adds a few %). I have driven to work (1 hr) and been negative when I arrive. I have driven for 20 minutes and gotten +20%. Placement of the phone is key. It does get Very hot when I'm there. I have the Pixel 3 XL and have tried every config and still get random results. Great for maintaining and perhaps adding a small amount. But, I would still NEVER pay $500 for it again. I would say, to me, the factory is worth $75. If you can get this for $75...that is awesome and I am so proud of you! Wish I Could have gotten it for this price. I am now actually thinking of buying it and swapping mine out to see if things get better. Paul |
|
Appreciate
1
SROC31702.00 |
| 05-26-2019, 12:50 PM | #21 |
|
Captain
731
Rep 988
Posts |
Got this too but received the 2-pin harness versus the 3-pin. Not sure what’s up with that seller, but he message me saying he was shipping out a new harness. It’s just going to take a while since it coming from China.
As for the OEM option the $500 also gets you the in-car cellular function which is pretty sure we can’t add after the fact. |
|
Appreciate
0
|
| 05-29-2019, 07:50 PM | #22 | |
|
The limit of adhesion is my home.
1702
Rep 3,778
Posts |
Quote:
__________________
2019 X3 xDrive30i Glacier Silver | Cognac w/ Fine Cove | MSport | Premium | Dynamic Handling PKG | Drive Assist | HK w/ Bavsound Upgrade |
|
|
|
Appreciate
0
|
Post Reply |
| Bookmarks |
|
|


