

Welcome to the ultimate BMW X3 community.
| 07-11-2020, 04:30 PM | #1 |
|
Colonel
 1394
Rep 2,221
Posts |
Subwoofer, Amplifier, and Line Output Converter Install on my X3MC (Warning - Long!)
Purpose:
This post is to document my subwoofer and amp install on my X3MC. Hopefully it will answer some questions for those looking to do the same. I should note, although I have installed audio upgrades in my past cars, I am no expert and learned a lot of what I did by searching forums. I am also welcome to input for improvements. Also note, I was comfortable with the trade off of bass vs. space. You can use a smaller enclosure or do something custom (especially if you do not have the spare tire). Most of the below will still be applicable. That said, I love JL Audios W7 and have had this particular enclosure for over 15 years. Background: I did the BAV Sound upgrade (including under seat woofers) previously. Although this was a good improvement (especially mid-bass), it did not do much for the really low end (<50 Hz). I had equipment from my old install (2005 E46 M3) that I wanted to leverage as it sounded awesome. I upgraded my sub amp (newer models are significantly smaller) in order to fit into the limited space but leveraged my existing sub box. Parts list:: - Vehicle: BMW X3MC - Amplifier: JL Audio XD 600/1v2 - Bass attenuator knob for amplifier - Line Output Converter (LOC) AudioControl LC2i - Subwoofer (Discontinued): JL Audio HO110R-W7 - Integration Harness: TechnicPNP Add-a-sub (this allows you to get high-level output to feed to the LOC) - Organizer Box - RCAs - 90 Degree RCA connectors - Wire (heavy OFC gauge power/ground, various colored small gauge, speaker) - Power wire sheathing - Speaker/RCA wire sheathing - Power cable lug - Power cable hydraulic crimper - Circuit breaker - Add a fuse - Inline fuse holder - 1 Amp Fuses - Heat shrink tube - Uninsulated wire ferrules (for power/ground into amp) [/URL] - Tesa Felt tape - Small wire crimper/insulated ferrules - Peal and Seal (sound deadening) - Egg crate foam (sound deadening) - Adhesive foam strips for license plate (to stop rattles) Methodology: This is my first new car in over a decade. I learned that the integration of the head unit (stereo) with other features like the onboard computer and amplifier (HK in this case) necessitated a Line Output Converter (LOC). More specifically, one that was active (i.e., powered) vs the old ones that just plugged in without power. The high level output from the HK carries an amplified signal that is too hot for a non powered LOC. Moreover, the LC2i was highly rated for this purpose. Install: Part 1 (Disassembly): https://www.newtis.info/ is an excellent resource to understanding how things come apart and go back together. I started out removing just what I thought I needed to remove, then just ripped out basically the entire trunk. I should note, most of my install was done in my tiny 1 car garage so please excuse the lack of order as staging space is limited. In order to keep track of all the various screws and connectors, I leveraged an organizer box like the one below along with a pen and small Post-It notes to label where parts were taken from (i.e.:, Rear Drivers Side Cubby or Battery Hold Down Bracket). Each set of hardware in its own little compartment. I HIGHLY recommend doing this as there are dozens of screws/clips and it is easy to lose track of what goes where. Furthermore, you can see that you put all hardware back (I had forgotten some friction clips after reassembly but luckily saw them in the box)    Part 2 (Sound Proofing): When you are driving a sub with a lot of power, you are going to get rattles. Although BMWs are sound proofed better than many vehicles, they can still benefit. The serious audio guys will use Dynomat or another brand. Personally, I have had great success with Peal and Seal. It is a roofing material that is basically tar on thick tinfoil and has much of the same makeup and works wonders. Moreover, its CHEAP ($16/roll). Installing it is fairly easy. Just cut to size and stick down then push it to the contours of the metal. Its a good idea to use a heat gun as that will soften it up and make it stick much better. It has been pretty hot so I didnt use the heat gun on all parts. Note, you should clean the parts you are sound proofing with Denatured Alcohol. This is great stuff to have around the house and takes off grease (and rust proofing spray) well. Better than rubbing alcohol and it should be used instead. You can find it in the paint isle of your local home store. The drivers side wheel well had a big cavity (along with a roll of sound insulation) but I could not get to the passenger side. So far it has not been an issue. Not my neatest work because I could only get my arm in the hole.   ] 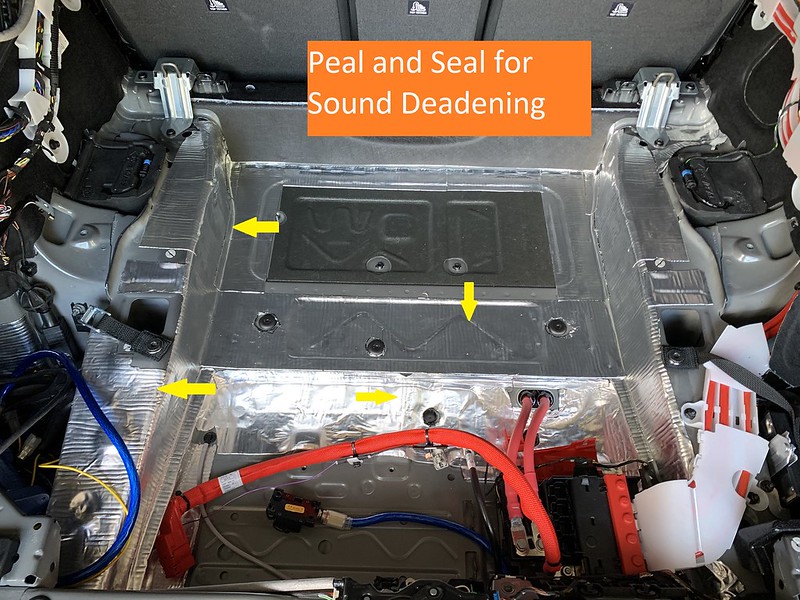 After I completed the install, my tailgate and license plate were rattling like crazy. I decided to Peal and Seal what I could as well as stuff some egg crate foam which helped tremendously. Ideally I would have used sound proofing foam (denser) but this is what I had on hand. I will also order some sound proofing foam to fill the cavity behind the lift gate trim (pics to come). Part 3 (Amp Mount): Hidden space on the X3MC (with spare) is limited. I saw some other installs in the G01 forum and I figured I would replicate. First, I made a template out of a Chex cereal box (  ) to make sure things would fit (I actually did this prior to ordering the amp). It looked like it would work in the drivers side cubby behind the panel. ) to make sure things would fit (I actually did this prior to ordering the amp). It looked like it would work in the drivers side cubby behind the panel.[  I got some welding plate (3/16 I think) from Lowes. I made a carboard template and then cut the welding plate to size using a combination of a Rotozip and finally an angle grinder with a metal cutting blade once my Rotozip blade disintegrated. Im no metal expert but it turned out ok. In my garage I had some of that car door edge guard that I put around the template to reduce sharp edges and the chance of cutting wires. Along with a few coats of satin black spray paint and I was pretty happy with how it turned out. I also sprayed the sheet metal screws so they would blend in better. 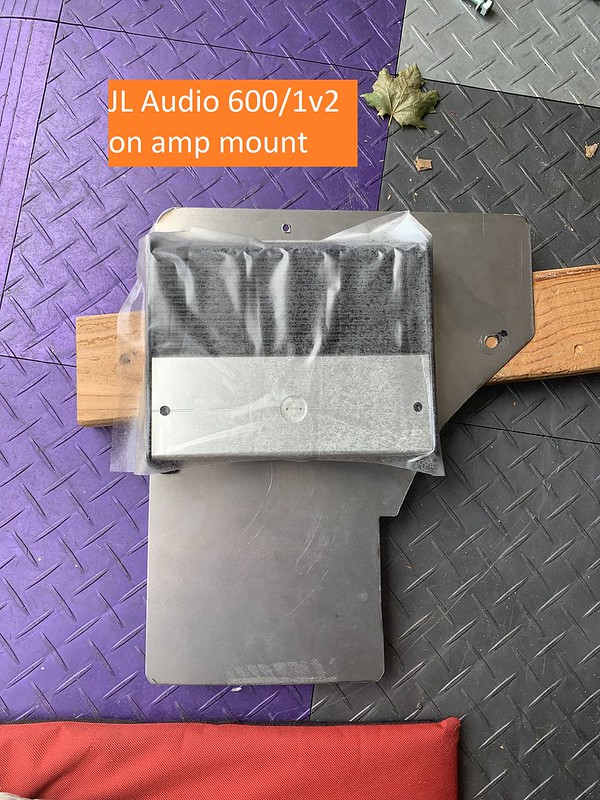  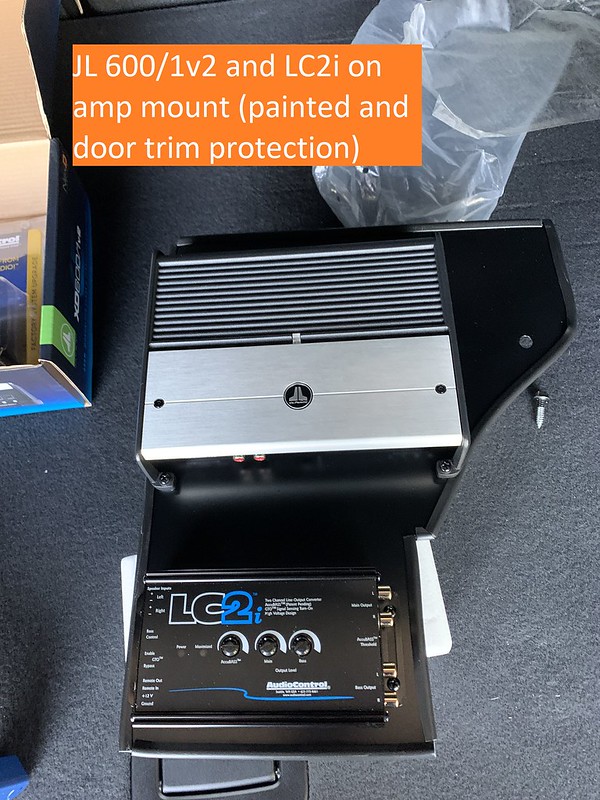 Part 4 (Wiring Things Up): Although my amp calls for 4 AWG wire, I had 2 AWG wire and wanted to use than in the event I found myself adding another amp in the future (I could then use a distribution block with two 4 AWG wires to the amps). 4.1: Power Connections Amplifier: I realized it would have been difficult to attach to the positive battery terminal, but luckily BWM has the wire going to a distribution block. My original wire lugs (screw down type) were too big to fit under the cover so I got some crimp on ones and used that. I found this cool blue wire sheathing on Amazon (my wire is blue) so I installed that as well on the amp power wire.   Getting 2 AWG wire in the 4 AWG wire inputs on the amp was a bit tricky. To reduce/eliminate the chance of a short, I used uninsulated wire ferrules (more on that discovery below) and used the hydraullc crimper along with some clear adhesive heat shrink tube. Worked well and no worry about stray wires. 4.2: Fuse/Circuit Breaker - Amplifier: All amps call for a fuse (50 amps in the case of mine) but I prefer to use circuit breakers. They accomplish the same thing and you can shut them off or reset much easier. 4.3: Power Connections LOC: After speaking with AudioControl, they advised I should run a separate power wire (with 1 amp fuse) for the LOC along with a turn on lead (they sad their Great Turn On GTO feature which turns on the LOC when it senses voltage at the speaker) did not work well on BMWs. As a result, I ran a separate turn on lead using the add a fuse. Since my fuse 218 (ASD) was pulled, I used that space in the panel. The power wire runs right to the battery distribution where I connected the amp power wire. Side note, I always used electrical tape until I read about the felt tape. This stuff is AMAZING and I find I will rarely use the regular electrical tape for car work again. Makes things look OEM, sticks well, no residue.  4.4: Ground Connections: The engineers at BMW were nice to me and I found an existing ground screw where I grounded both the amp and LOC (in pic below). After I took this pic, I found there was another unused ground screw to the left so I used that one (no pic).  4.5: HK Signal Connections: This is where the TechniqPNP harness comes into play. The harness plugs into the HK amp then to the harness that was in your amp. It comes with two additional harnesses depending if you are adding an amp/sub or sending power to your underseat woofers (assuming you replaced them with aftermarket). I just needed the output for an additional sub so used that harness. This feeds into the LOC which converts the signal to low level (RCA).  Note: The instructions for the harness state the Accubass feature (the feature than counteracts the bass signal lowering as you turn up volume on your OEM stereo) should be disabled. There is a small gain control on the right side which I turned all way off (counter-clockwise). I assume BMW does not turn down the bass as you increase volume. So far it is working awesome turned off. As a side note, I used 90 degree RCAs so I did not have to drill a hole in the cubby. 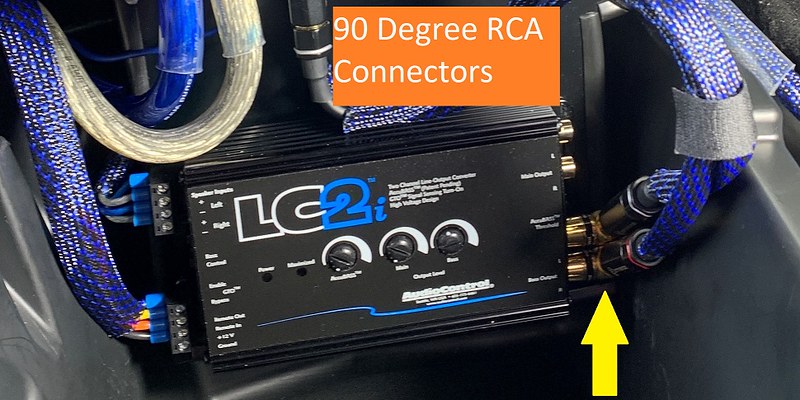 As part of this project, I learned about wire ferrules. They take the strands of wire and keep them in a neat crimped connector that is perfect for set screws. Another highly recommended product is the small ferrule crimper linked above which comes with more connectors that you will likely ever need.  4.6: Bass Attenuator Knob: The purpose of these devices is to lower bass volume. They are not a bass boost, rather an attenuator. In other words, if they are on fully clockwise it is as if they are not installed. As you move them counter-clockwise they lower the bass volume from your amp. As songs vary in bass level, youll want an easy way to turn down/up the bass volume. Additionally, your sub may overpower the HK amp and speakers so it is a great way to match the levels. JL has this as an accessory, but you can also get one for the LC2i from AudioControl. Mounting in the X3MC requires some guts as there are no great places to mount without drilling something expensive. For now, I have mine in the cubby hole near the drivers door but ultimately would like to mount right under the iDrive controller knob. As that part is >$300, Ill see if I can live with it where it is. Admittedly, this is not an ideal location.  4.7: Tuning: In order to get things sounding right (and within the limits for your amp), you have to set the gain level on the LC2i and your amp. AudioConrol offers instructions which leverage the Maximized light on the device as a guide. Instead, I used the procedures from JL audio in their 9 step process. Basically you are measuring the AC voltage (with a digital multimeter) of the speaker outputs for your amp while your stereo is at 3/4 volume (all EQ/processing set to flat/off) and targeting a specific voltage for the total resistance of your sub (3 ohms in my case). I was able to turn up the gain (bass level) on the LC2i to match the correct AC voltage output by my amp speaker outputs without having to turn up the gain on the JL Audio amp at all. This is, apparently, an ideal situation as you are giving the amp the exact maximum input voltage and you are not introducing any noise/distortion by using the amps gain. I used to just do this by ear, but apparently this procedure was a feature of my old amp as well. Good idea to read instructions! I also selected the lowest (50 hz) crossover for my amp as I like the sub only to play the very low end music. The results are amazing and has completely brought the system to life. The bass is almost painful and distorts both the rear view and side mirror images. Perfect! I left the HK EQ mostly flat and turned down the treble a bit. Ill probably tweak slightly as I get more comfortable with the sound. You may not like the same amount of bass as I, so you can easily turn down with the attenuator knob and/or get a smaller amp and sub. 4.8: Finished!: All in all Im very happy with the way it turned out (sans the screaming red carpet on the box lol). It was a fun project (except for the heat) and allowed me to learn a bunch of new stuff about factory integration. If Bav Sound comes out with an HK amp replacement I will probably upgrade to that if it gets enough positive reviews. Ideally I would love to get a full range JL amp (like I had in my previous install) and use my Rockford Fosgate components (Im not 100% certain this is possible though). Well see .    Last edited by spta97; 07-11-2020 at 06:43 PM.. |
|
Appreciate
21
AlexFL7836.00 ltym5195.50 j080808129.00 VipinLJ1941.50 sd306380.50 Douggie142.00 Thewolfbmw215.50 DucatiT1098S163.50 Kevin_The_Clean13262.00 smanji132.50 spucktacular349.00 Transfer5254.00 suby012314.00 Alias1431795.00 Must_Go_FASTER502.00 bear1m87.00 D-Pat Murph290.00 F36_CB1K18.00 D80831.50 BeastReceipt1.50 ILLMATIC2313.50 |
| 07-11-2020, 06:56 PM | #4 |
|
Colonel
4735
Rep 2,531
Posts |
A wonderfully documented DIY project - thanks for sharing and I enjoyed reading your thought process. But... just reading through the possible pitfalls which could happen if I tried this - it would be a definite no for me to try it, but congratulations on your install!
 |
|
Appreciate
0
|
| 07-11-2020, 09:24 PM | #6 | |
|
Colonel
1394
Rep 2,221
Posts |
Quote:
|
|
|
Appreciate
0
|
| 07-11-2020, 09:25 PM | #7 | |
|
Colonel
1394
Rep 2,221
Posts |
Quote:
|
|
|
Appreciate
0
|
| 07-12-2020, 08:12 AM | #10 | |
|
Colonel
1394
Rep 2,221
Posts |
Quote:
Also, a ported enclosure would give you more volume than a sealed enclosure (though sealed are supposed to hit tighter). If I wanted to save more space I might look into this one: JL-Audio-CLS110RG Ive had really good experience with the W7 so I am a bit biased. Im sure there are other brands that are good as well. But this single 10 W7 hits harder, lower, and louder than a previous JL box with 2 non-W7 12s. If you dont have a spare, there are a few members in the G01 forum who did custom enclosures under the hatch floor. Edit - Check these threads for other installs: https://x3.xbimmers.com/forums/showthread.php?t=1588268 https://x3.xbimmers.com/forums/showp...0&postcount=25 Last edited by spta97; 07-12-2020 at 08:28 AM.. |
|
|
Appreciate
1
Alias1431795.00 |
| 07-14-2020, 10:54 PM | #11 |
|
Private First Class
 
49
Rep 141
Posts |
Thanks for the walkthrough! This is great. I just pulled the Earthquake upgraded underseat subs out of my 340, hoping they'll fit in the X3M once it arrives next week, but might look some JL subs in small enclosure for the trunk too
|
|
Appreciate
0
|
| 07-15-2020, 06:40 AM | #12 | |
|
Colonel
1394
Rep 2,221
Posts |
Quote:
The harness isnt required (you can tap speaker lines) but it prevents you from having to cut/splice. Please post back with what you do! |
|
|
Appreciate
0
|
| 11-11-2020, 01:57 PM | #14 |
|
General
 
12968
Rep 18,713
Posts |
Sick setup!!!
__________________
Email:sales@rgsport.com | IG:RGSport_USA | Web:RGSportShop.com PM for Everyday DEALS!! MSS iSweep RaceChip Sterckenn AutoTecknic Akrapovic Vossen Wheels Eventuri Active Autowerke KW H&R Ohlins Remus and more... |
|
Appreciate
0
|
| 11-11-2020, 02:45 PM | #15 |
|
Private
 14
Rep 67
Posts |
Can you grab full range signal with the Technic PNP harness, then run that to a DSP + multiple Amps, then run speaker wire to aftermarket speakers? I'm looking for the best way to accomplish that.
|
|
Appreciate
0
|
| 11-12-2020, 01:07 PM | #16 | |||
|
Colonel
1394
Rep 2,221
Posts |
Quote:
I wish I could have used the speakers of my choice (Rockford Fosgate) but I was limited to what would fit. Quote:
Quote:
Please post back if you find out and what you do with your system. |
|||
|
Appreciate
1
r33_RGSport12967.50 |
| 04-28-2021, 11:01 PM | #17 |
|
Registered
0
Rep 1
Posts |
spta97 - Amazing write up. Had a couple questions. I'm looking at a JL all-in-one box that has high-level in: https://www.jlaudio.com/products/acs...-systems-93334
I used to do car stereo install stuff way back when in my 20s, so diving in here is somewhat exciting for me as something I haven't done in a while. I was wondering why you need the Audio Control LOC if you have the Technic piece? Just some more control over things? I was just wondering if I could use the Technic harness / adapter and go right into my JL box. Thanks! A |
|
Appreciate
0
|
| 04-29-2021, 04:13 AM | #18 |
|
Brigadier General
3262
Rep 3,912
Posts |
spta97 - I wish you lived closer so I could see this nice setup in person.
__________________
1998 E36 M3 - Totaled
2003 E39 M5 - Gone but not forgotten 2011 E90 335i M-Sport - Daily Driver 2017 F87 M2 - Sold & missed 2020 F97 X3 M Competition - Finally arrived  /// /// |
|
Appreciate
0
|
| 04-30-2021, 11:50 AM | #19 | ||
|
Colonel
1394
Rep 2,221
Posts |
Quote:
The Audio Control LOC is required to convert the "hot" signal to line level so your amp can ingest at the appropriate voltage. Also, it allows you to set the gain so increase/decrease the signal to match to your amp (I used to do this by ear but as part of this process learned it can be done exactly with a multimeter). If you went right in with the harness into the amp (assuming your amp has high level inputs in addition to low level inputs) you would lose control over the level required to set the input gain. The HK signal is very hot apparently and requires a powered LOC (as opposed to non-powered) in order to handle it. Audio Control has some amps which have the LOC built-in (and have good reviews). Best bet (if you do have high level inputs) is to reach out to JL and see what they say. Perhaps their high level inputs can handle the HK signal voltage. That said, the LOC is not too expensive and fairly easy to wire up. Audio Control gave awesome support as well. Edit - I see that sub/amp box does have high level inputs so it may be an option to forego the LOC but double check the output wattage of the HK/BMW amp and check with JL prior. Personally I would go with the LOC but that's me Quote:
Last edited by spta97; 04-30-2021 at 01:08 PM.. |
||
|
Appreciate
0
|
| 05-21-2021, 11:32 AM | #20 |
|
Registered
0
Rep 2
Posts |
X3 d01 base factory amp wiring
Hi
I am new here. Thanks for your good sub install writeup. If you know base model amp wiring please let me know. I just need 3 wire tap. Rear left, rear right and and remote Thanks |
|
Appreciate
0
|
| 05-23-2021, 09:08 AM | #21 | |
|
Colonel
1394
Rep 2,221
Posts |
Quote:
Check the X3 G01/G02 forum - you may find the info you seek. |
|
|
Appreciate
0
|
| 05-23-2021, 09:37 PM | #22 |
|
First Lieutenant
 349
Rep 328
Posts
Drives: BMW
Join Date: Feb 2017
Location: Canada
|
 reminds me of when I was young and fun |
|
Appreciate
0
|
Post Reply |
| Bookmarks |
|
|


