Welcome to the ultimate BMW X3 community.
| 05-28-2020, 10:19 AM | #1 |
|
Colonel
 1394
Rep 2,221
Posts |
Wrapped My V-Brace
I always thought this looked cool so I wanted to do it.
My goal was to match the color of the ///M calipers and I found that 3M 1080 G217 Gloss DEEP Blue Metallic matched very well. The hardest part was trying to get the ends of the brace wrapped well due to parts in the way. If I have to do it again I will try to remove the entire brace but I am hoping it will hold up. It's my first attempt at wrapping but pretty happy with the way it turned out (the parts you can see anyway  ). It's subtle but noticeable in the sun. ). It's subtle but noticeable in the sun.Speaking of, I have to get some pics in the sun... I'll probably tackle the engine braces next. Fun and cheap project with the exception of my grills not wanting to come out. ")     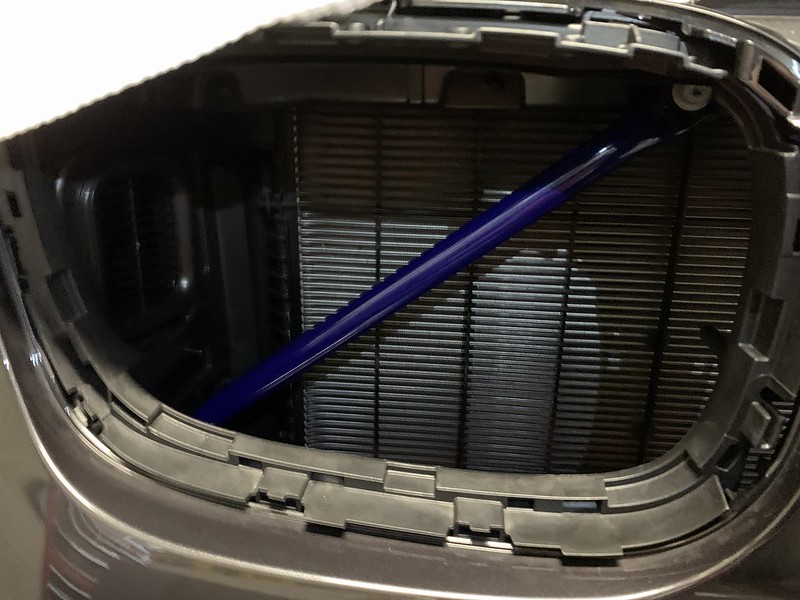      |
|
Appreciate
9
AlexFL7837.00 pluckydks621.50 smithf802808.50 cfm56d7b5886.00 Thewolfbmw215.50 BeyondVision39.00 r33_RGSport12967.50 leon360x139.50 gman_newyork239.50 |
| 05-28-2020, 03:25 PM | #3 | |
|
Colonel
1394
Rep 2,221
Posts |
Quote:
I'm back and forth on carbon fiber or the blue for the engine braces as well. I really like the blue though I'm afraid it may look a bit much. I do like pop though. For the braces, how about matching to your interior color (if you have red or yellow)? The braces are so hidden most people won't notice they are wrapped regardless of color unless they see it head on. When you decide, please post up some pics! |
|
|
Appreciate
0
|
| 05-28-2020, 03:59 PM | #4 |
|
Enlisted Member
 39
Rep 37
Posts |
I did mine last night! Didn't remove the bar either and would agree for a proper clean wrapping that would be the best bet...but honestly wasn't an ROI for me there. It looks fine and you can't see the top because it is blocked by the grill. Wanted to match the msport blue just like you, but took a risk for $15 bucks on amazon for a matte metallic that imo is understated and turned out great. When I was looking closely at the brake calipers and blue in the logo and the M, it all seemed different depending on the lighting condition and the shadows so I don't think its worth the hassle (or price) to find the match. Some poor pics during it:
Edit...fixed Last edited by BeyondVision; 05-28-2020 at 07:40 PM.. |
|
Appreciate
2
AlexFL7837.00 r33_RGSport12967.50 |
| 05-28-2020, 04:01 PM | #5 | |
|
Brigadier General
 7837
Rep 4,607
Posts |
Quote:
|
|
|
Appreciate
1
BeyondVision39.00 |
| 05-28-2020, 05:21 PM | #7 | |
|
Colonel
1394
Rep 2,221
Posts |
Quote:
Like me, it looks like you finished late and were looking forward to seeing it in the sun It's been cloudy since last night but I'll take a pic on Sunday when it is, ironically, supposed to be sunny  |
|
|
Appreciate
0
|
| 05-28-2020, 07:36 PM | #8 | |
|
Enlisted Member
39
Rep 37
Posts |
Quote:
|
|
|
Appreciate
0
|
| 05-28-2020, 07:45 PM | #9 | |
|
Enlisted Member
39
Rep 37
Posts |
Quote:
 |
|
|
Appreciate
2
AlexFL7837.00 socalhawki33.00 |
| 05-28-2020, 09:34 PM | #12 |
|
General

12968
Rep 18,715
Posts |
Looks good guys.
 I was debating to change mine from RaceChip orange to Carbon Fiber, but, CF is kinda hard to see. It doesn't stand out.
__________________
Email:sales@rgsport.com | IG:RGSport_USA | Web:RGSportShop.com PM for Everyday DEALS!! MSS iSweep RaceChip Sterckenn AutoTecknic Akrapovic Vossen Wheels Eventuri Active Autowerke KW H&R Ohlins Remus and more... |
|
Appreciate
0
|
| 05-28-2020, 09:37 PM | #13 | |
|
Brigadier General
7837
Rep 4,607
Posts |
Quote:
|
|
|
Appreciate
3
|
| 05-28-2020, 09:44 PM | #14 | ||
|
General
12968
Rep 18,715
Posts |
Quote:

__________________
Email:sales@rgsport.com | IG:RGSport_USA | Web:RGSportShop.com PM for Everyday DEALS!! MSS iSweep RaceChip Sterckenn AutoTecknic Akrapovic Vossen Wheels Eventuri Active Autowerke KW H&R Ohlins Remus and more... |
||
|
Appreciate
1
AlexFL7837.00 |
| 05-28-2020, 09:51 PM | #15 | |
|
Major
 1305
Rep 1,221
Posts |
Quote:
|
|
|
Appreciate
3
|
| 05-28-2020, 10:49 PM | #16 | |
|
Private First Class

441
Rep 165
Posts |
Quote:
|
|
|
Appreciate
0
|
| 05-29-2020, 01:20 AM | #17 | |
|
Lieutenant Colonel
 
1299
Rep 1,927
Posts |
Quote:
caliper blue like yours is currently fave |
|
|
Appreciate
0
|
| 05-29-2020, 06:01 AM | #19 | ||
|
Captain
 
219
Rep 690
Posts
Drives: 2019 X3 M40i
Join Date: Jan 2011
Location: Perth Western Australia
|
Quote:
Quote:
Are you able to briefly describe how you did it from the step after removing the grills? I've bought some stuff to put on but not 100% sure of best process. is it as simple as cutting a 2 inch wide strip and placing it on? Did you clean the strut first etc? Thanks... |
||
|
Appreciate
0
|
| 05-29-2020, 08:07 AM | #20 | ||||
|
Colonel
1394
Rep 2,221
Posts |
Quote:
Here is the process: The issue I had was the tabs on the side of the grill would not let go. I broke that clip on the passenger side, but was able to get a plastic pry tool in on the driver's side to release it. I epoxied the broken clip back on so good to go again. Quote:
Quote:
Though, I did notice some scratches on mine likely from road debris. The blue I used is in my 1st post. Post back yours once you decide on a color and install!Quote:
2) Wash your hands - even though you cannot help touching the bar as you wrap it, it is a good idea to minimize dirt/oil. 3) Measure the length with a tape measure, then take a piece of paper and wrap it around to get the circumference and measure that by marking a slight (~1/4") overlap. I learned it is best to have the wrap overlap itself. I cut mine to 16 1/2" x 3 1/2". 4) I tried to just peal away the backing lengthwise in order not to expose more than I could work with. Because of the limited space, this didn't work out so well so I took off the entire backing. Make sure you don't let the vinyl grab onto anything. 5) Start in the middle of the wrap and front of the bar from the top to the bottom. I was only really concerned with what showed. 6) Once lined up, press down with your finger and push out any air bubbles from the center front middle to the back of the bar. Try to stick down only what is smooth and watch out for wrinkles. 7) Work the length small sections at a time then start again from the top and push further to the back. Repeat until it is all stuck down. 8) Now do the same starting from the front of the bar down back to the underside so it wraps around the back. 9) The ends of the bar are the hardest due to the shape and limited space. You may want to cut yours shorter as it will need to be pushed back past some of the car body on an angle. That's what I did anyway. The vinyl is pretty forgiving (you can peel it back up) but can stretch or rip. There are several vids on YouTube. Here's one where he took the bars off: |
||||
|
Appreciate
1
vampire81434.50 |
| 05-29-2020, 08:12 AM | #21 | |
|
Colonel
1394
Rep 2,221
Posts |
Quote:
 |
|
|
Appreciate
0
|
| 05-29-2020, 11:29 AM | #22 | |
|
Enlisted Member
39
Rep 37
Posts |
Quote:
Pretty much followed the same steps that you said, although I didn't worry too much about perfectly wrapping behind the bar because you can't see it. I started as close to the top of the v brace first (around the flat edge) and worked my way down to press the vinyl in the center of the vbrace, then proceeded to wrap around one side and then the other to ensure no bubbles. Overall it took me like 30 min. I hate removing the grill because of the amount of pressure you need to apply to the 3 clips at the top. |
|
|
Appreciate
0
|
Post Reply |
| Bookmarks |
|
|