

Welcome to the ultimate BMW X3 community.
| 08-31-2022, 02:03 AM | #23 |
|
Captain
 
1074
Rep 902
Posts
Drives: 2022 X3 M40i LCI
Join Date: May 2021
Location: Surrey UK
|
Nice job. Be interested to know, if you work it out when you do the front seats, how the seat badges illuminate.
__________________
2022 X3 M40i LCI. Brooklyn Grey Metallic. Driving Assistant Professional. Black with Blue Stitching Vernasca Leather M Seats. Comfort Pack. Pano Roof. Carbon Fibre Interior Trim, inc. seat backs. 21 718 Alloys. Blue M Sport Callipers. Anniversary badges. Floating centre caps. Performance flow through rear spoiler. Front splitter. Carbon mirror caps. OEM carbon steering wheel trim. G80 carbon paddle shifters.
 |
|
Appreciate
1
Pepppie82.50 |
| 08-31-2022, 03:22 AM | #24 | |
|
Private First Class
 
83
Rep 157
Posts |
Quote:
 . Think I'll build the harness if it doesn't work with just the cables under te seats. . Think I'll build the harness if it doesn't work with just the cables under te seats. |
|
|
Appreciate
1
Shaun1701073.50 |
| 09-04-2022, 02:51 AM | #26 |
|
Private First Class
83
Rep 157
Posts |
Update 4; rear doorpanels finished
Update 4; rear doorpanels finished
Found some time yesterday in the evening to swap the rear doorpanels. First one took some time to figure out how to remove the strips, but when I knew how to drill out the melted plastic points, it was quite an easy job. I used this guides: After removing the panel I had to swap the window switch, the little light on the bottom of the door and the RGB-LED from the doorpockets.  Then moving on and removing the strip: 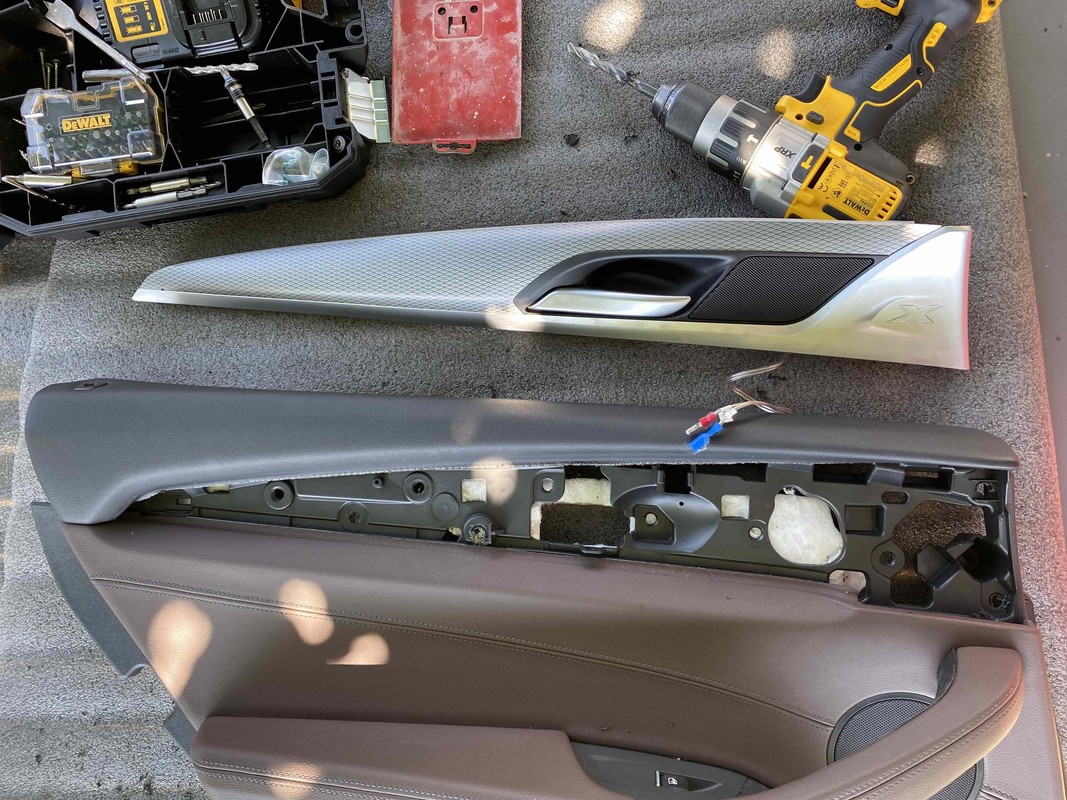 And then putting everything back together on the new doorpanel  And finally; everything mounted!  This week I'm looking for some time in the evening to swap the front doorpanels, hoping it will go as nice and smooth as the rear panels! |
|
Appreciate
1
dinan5m34263.50 |
| 09-04-2022, 05:32 AM | #27 |
|
Lieutenant
834
Rep 444
Posts |
I look forward to these updates on this project you’ve taken on, respect.
Whist pondering on your success so far and thinking how much patience you have doing it a little at a time (I would be chomping at the bit to get it done) I thought what will happen to your car when it’s time to change �� Has this project ruled out BMW ever taking it in as a part exchange should you go that route of course? |
|
Appreciate
1
Pepppie82.50 |
| 09-06-2022, 09:23 AM | #28 |
|
Private First Class
83
Rep 157
Posts |
Update 5; front doorpanels swapped
Found some time yesterday in the evening to swap te front doorpanels. Also replaced the button for the central locking (in the interior strip) with one with M-1-2 buttons for the memory seats. Wiring will follow later when placing the seats.
The front panels are almost the same as the rears doors, but I've attached the guide to this post. First I had to took the complete wiring out of the existing panel and of course swap the lights, doorhandle, strips, window switch, etc.  But, after 3 panels done; the left front was finished in less than 30 minutes  And; dinan5m3 the center console will be next! But first I'll go on holiday for 2 weeks  Last edited by Pepppie; 09-06-2022 at 09:29 AM.. |
| 09-06-2022, 09:35 AM | #29 | |
|
Private First Class
83
Rep 157
Posts |
Quote:
And responding to your question; I got a lot of support from my BMW dealer and they are very interested in this project. In the past I did many projects (most of the time with interiors) on former BMW's I've owned, so they know me  Never had issues with warranty (of course only the other parts of the car and not the interior parts) or trading in the cars. Never had issues with warranty (of course only the other parts of the car and not the interior parts) or trading in the cars. Contrary even; I've been called a few times in the past if I was interested in trading in because they had a client for the car. And they are lucky; my car is always for sale (if I can make a good deal of course)! |
|
|
Appreciate
1
BuickNut0.00 |
| 09-07-2022, 06:11 AM | #30 |
|
Private First Class
57
Rep 191
Posts |
Thanks for sharing your progress. Seeing as you have had both versions of the rear door card side-by-side, do you think it is possible to retrofit blinds to the rear doors?
__________________
Keeper: 2012 E92 M3 Comp KA401 - Santorini Blue
Daily: 2022 iX3 M Sport Pro - Phytonic blue with laser lights & towbar Previous: G20 M340i, F36 430d, Mk7 GTI PP, Mk5 GTI ED30 |
|
Appreciate
1
Pepppie82.50 |
| 09-07-2022, 08:38 AM | #31 | |
|
Private First Class
83
Rep 157
Posts |
Quote:
I've attached the manual for replacing the modules, so you can see what the work will be! |
|
|
Appreciate
1
kevinm0356.50 |
| 09-07-2022, 09:10 AM | #32 | |
|
Lieutenant
834
Rep 444
Posts |
Quote:
 Anyway, as mentioned, keep the updates coming, its looking fab Anyway, as mentioned, keep the updates coming, its looking fab |
|
|
Appreciate
1
Pepppie82.50 |
| 09-08-2022, 06:07 AM | #33 | ||
|
Private First Class
57
Rep 191
Posts |
Quote:
Quote:
__________________
Keeper: 2012 E92 M3 Comp KA401 - Santorini Blue
Daily: 2022 iX3 M Sport Pro - Phytonic blue with laser lights & towbar Previous: G20 M340i, F36 430d, Mk7 GTI PP, Mk5 GTI ED30 |
||
|
Appreciate
1
Pepppie82.50 |
| 12-02-2022, 02:55 AM | #34 |
|
Private First Class
83
Rep 157
Posts |
Update 6; December 2; passenger seat and center console
Update 6; December 2; passenger seat and center console
Has been a while since my last update, but had some time this week and placed the center console and the passenger seat! First of all; I had to remove the old seat and center console. I used this manual, which made it very easy to do! Everything removed:  New center console installed:  Next thing was to modify the cable harness under the seat! I've figured out (thanks to NewTis.info) that I was missing 4 wires; Pin 5; CANBUS (yellow-brown), 0,35mm to CANBUS (hub) Pin 6; CANBUS (yellow-red), 0,35mm to CANBUS (hub) Pin 11; LIN-BUS (yellow-grey), 0,35mm to BDC (pin 52, module 9B) Pin 15; power (red), 2,5mm to fusebox (fuse 55)  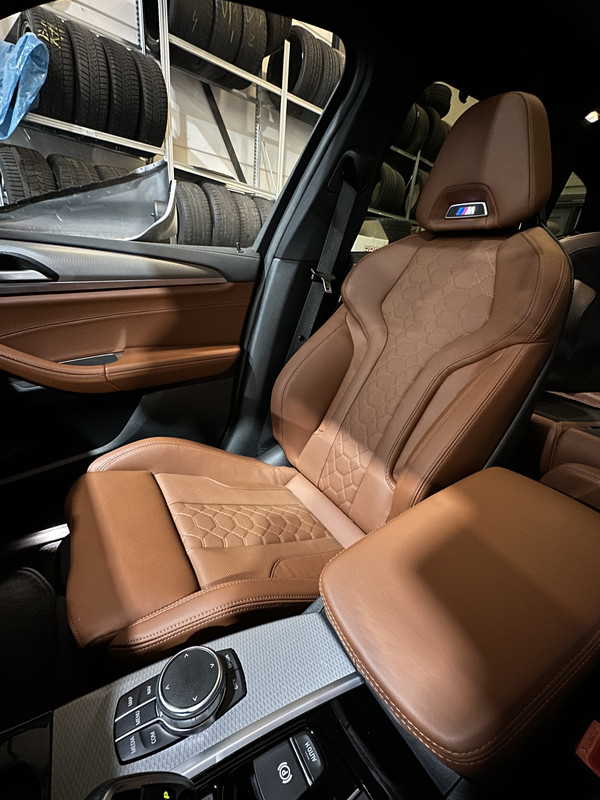 After modifying the harness, the only thing that was left was installing the seat! Looks great I think Next week the final seat; my seat After that, I only have to code the car to add the options (memory seat, electric seat and ventilation). Found a great company nearby to make that changes. Shaun170 your question about the illumination of the M-badge; that is pin 11 / the LIN-BUS cable. You don't need the Y-harness if you add that wire to the BDC! dinan5m3 you like the center console? Last edited by Pepppie; 12-05-2022 at 01:43 AM.. |
|
Appreciate
7
|
| 12-02-2022, 05:33 PM | #36 |
|
First Lieutenant
260
Rep 381
Posts
Drives: 2023 BMW X3M40 1984 911 TARGA
Join Date: Nov 2020
Location: Prescott Valley AZ
|
WOW!!!!!!!!!!!!!
__________________
2023 X3 M40I 2018 X3 30i M Sport
2011 550i 2005 325i 1985 535I 2017 F150 2016 GS 2004 545i 1994 525I 1984 911 TARGA 2014 HD ULTRA |
|
Appreciate
1
Pepppie82.50 |
| 12-02-2022, 11:28 PM | #37 | |
|
Colonel
 4264
Rep 2,067
Posts |
Quote:
    I need to absorb this some more, and i need to get back to you... TOO MUCH TO ABSORB right now... information overload Wait, let me go look at my center console been sitting on the table for "a while"...  I need MORE TIME !!! I need MORE TIME !!! |
|
|
Appreciate
3
|
| 12-04-2022, 03:21 AM | #38 | |
|
Private First Class
83
Rep 157
Posts |
Quote:
all the cables (I was very careful and took me some extra time). If you follow the manual and make pictures of how the wires are routed, it is a really easy job to do. |
|
|
Appreciate
0
|
| 12-04-2022, 03:28 AM | #39 |
|
Private First Class
83
Rep 157
Posts |
Update 7; December 4; OLED AC-panel installed
Did a small update this morning; replacing the old AC-panel (with buttons) and replaced it with the OLED-panel. Got this from a donor G3x. After coding all the (extra) necessary buttons (seat ventilation) will appear on the touchscreen. Now it only shows the current options.  |
|
Appreciate
1
dinan5m34263.50 |
| 12-04-2022, 06:05 PM | #40 | |
|
Colonel
4264
Rep 2,067
Posts |
Quote:
As for removing the passenger seat, was it "required"? I'm hoping to do the same without removing the seat. as for the "... follow the manual", what specific manual are you referring to? |
|
|
Appreciate
2
ocdx30.00 gofastbmw5100.00 |
| 12-04-2022, 06:08 PM | #41 | |
|
Colonel
4264
Rep 2,067
Posts |
Quote:
 Did you get a fault from this retrofit saying the IHKA has wrong variant installed? |
|
|
Appreciate
2
ocdx30.00 gofastbmw5100.00 |
| 12-05-2022, 01:46 AM | #42 | |
|
Private First Class
83
Rep 157
Posts |
Quote:
The manual is in my opening post and in the post with the center console update. Really easy to do. Should be possible without removing the seats, but it might be a little tight. I had the seat removed and that made it work great. edit: Forgot to say that you need to clear the errors after the job, because you will get some from the safety systems (airbags, seatbelt, etc.). |
|
|
Appreciate
1
dinan5m34263.50 |
| 12-05-2022, 01:48 AM | #43 | |
|
Private First Class
83
Rep 157
Posts |
Quote:
|
|
|
Appreciate
1
dinan5m34263.50 |
| 12-05-2022, 10:40 AM | #44 | |
|
Colonel
4264
Rep 2,067
Posts |
Quote:
Okay, i still have the fault code in ISTA saying "wrong variant" is installed for IHKA, because of control panel. I didn't expect that since i don't have the ceramic element optioned panel. Even if i do VO coding i'm not sure what i would code to since there is no other option to code and no other retrofit that would affect the function of the panel. And as you said the new panel should be getting the same information. Anyway, for now i won't worry about it, will revisit after i put in ceramic controls for idrive dial. |
|
|
Appreciate
2
ocdx30.00 gofastbmw5100.00 |
Post Reply |
| Bookmarks |
|
|


