

Welcome to the ultimate BMW X3 community.
| 10-14-2018, 02:24 PM | #1 |
|
New Member
13
Rep 24
Posts |
Vehicle: 2011 BMW X3 (xDrive 35i).
I have a front and rear dash cam (Aukey DR02D). The dash cam will connect to the OBD socket for power. There will be wiring for the front dashcam to the OBD socket and another longer USB wire for the rearcam (the cam will be placed at the top center rear liftgate window). Is there some documentation on how best to run the wiring for all this, especially the rearcam wiring. Thanks. |
| 10-14-2018, 04:21 PM | #2 |
|
Lieutenant Colonel
 
829
Rep 1,933
Posts |
You might take a look at Bimmer-tech.net - they might have some DIY instructions and videos that are of value. I think they are more focused on add-ons that get connected to the iDrive but give a look as their backup cams obviously require one to run wires to the rear hatch area.
Good luck/Bill |
|
Appreciate
0
|
| 10-14-2018, 06:11 PM | #3 | |
|
Lieutenant

121
Rep 470
Posts |
Quote:
__________________
Current mods
Rockford Fosgate P3 // JBL MS-A5001 // MiniDSP Ultra Racing Strut Brace // AFe Pro Dry S // PS2 // Custom Inlet // DV+ // FTP Boost Pipes // VRSF Race IC // VRSF Downpipe // ECUTek Protune @ 5280' |
|
|
Appreciate
1
deleted_397282_c43ae5ea84160.50 |
| 10-14-2018, 06:19 PM | #4 |
|
Major General
 
1924
Rep 5,115
Posts |
Some decent you tube vids out there as well
__________________
'11 Z4 30i (retired);'11 X3 28i (retired); '15 M235i Stage 1 Dinan (recalled & crushed); '16 M235i Stage 3 Dinan (retired); '15 X3 28i (retired); '14 328i (retired), 2019 X3M40i (retired); Loaded '18 X1 (retired); Loaded '20 X3MC DG, Black/Tan Merino (retired); Loaded '23 X1 Cape York green and Red/Black interior; '23 Audi A4 Allroad Progressiv
|
|
Appreciate
0
|
| 10-15-2018, 11:15 AM | #5 | |
|
Lieutenant Colonel
3332
Rep 1,912
Posts |
Quote:
Cam turn ON when you unlock the doors, and shutoff few minutes after locking the doors. easy and fast. |
|
|
Appreciate
2
deleted_397282_c43ae5ea84160.50 mike_MAN20.50 |
| 10-15-2018, 09:57 PM | #7 | |
|
Lieutenant
121
Rep 470
Posts |
Quote:
|
|
|
Appreciate
0
|
| 10-16-2018, 09:16 AM | #8 | |
|
Private First Class
 47
Rep 191
Posts |
Quote:
|
|
|
Appreciate
0
|
| 10-16-2018, 09:22 AM | #9 | |
|
Lieutenant Colonel
829
Rep 1,933
Posts |
Quote:
Last edited by Wgosma; 10-16-2018 at 10:13 AM.. |
|
|
Appreciate
0
|
| 10-23-2018, 11:13 AM | #10 | |
|
General of the Space Forces
179
Rep 729
Posts |
Quote:
|
|
|
Appreciate
0
|
| 10-23-2018, 11:35 AM | #11 |
|
Lieutenant Colonel
829
Rep 1,933
Posts |
I found some details on Bimmerfest forum- Believe it was green/brown wire. Requires removing the overhead dome light assembly, which is easy.
Out of town and away from computer - if you send me PM I will see if I can locate details in few days. Thanks/Bill |
|
Appreciate
0
|
| 10-23-2018, 02:58 PM | #12 |
|
Second Lieutenant
71
Rep 230
Posts |
I tapped to Front Fuse box (under glove box) to i believe F46 fuse. That block of fuses sits on 15N power line that is powered by ignition switch (has power when ignition is on).
https://www.newtis.info/tisv2/a/en/f...sav/1VnYbR4p3t |
|
Appreciate
0
|
| 12-14-2018, 10:49 PM | #13 |
|
Private
 31
Rep 88
Posts |
I am about to install a dash cam too. I am thinking to tap it to a constant +12v, so that it will continue to record since my car park on the street.
I think the dash cam that I bought has motion sensing meaning it will start recording when it detect motion when parked what do you guys think? Do you think it will drain the battery? Also, anyone know how to find or a location of a constant +12v. |
|
Appreciate
0
|
| 12-15-2018, 03:46 PM | #14 | |
|
Second Lieutenant

282
Rep 280
Posts |
Quote:
|
|
|
Appreciate
1
RL325xi30.50 |
| 01-16-2019, 03:13 PM | #15 | |
|
Private
21
Rep 89
Posts |
Quote:
I like this method because it is very clean and would adapt to most dash cams. The 12V sockets I see have two wires coming out, but the add-a-fuse only has one wire coming out from the fuse plug. Would I need to tap into (2) fuses? |
|
|
Appreciate
0
|
| 01-17-2019, 03:46 PM | #16 | |
|
Lieutenant Colonel
3332
Rep 1,912
Posts |
Quote:
Hi, 1 - You need to add a fuse. So a socket like this is needed. Theres 2 slots, one for the original fuse and the other to the red cable for the cam 12V+.  https://www.amazon.com/Support-Stand...Fuse+Tap+Piggy On the red wire I tap a female 12V soket for the camera power. The ground is tapped on a bolt I found next to the passenger door :  2- From the little door in the glovebox, you can reach the fuse #??? (cant remember see pics for position) 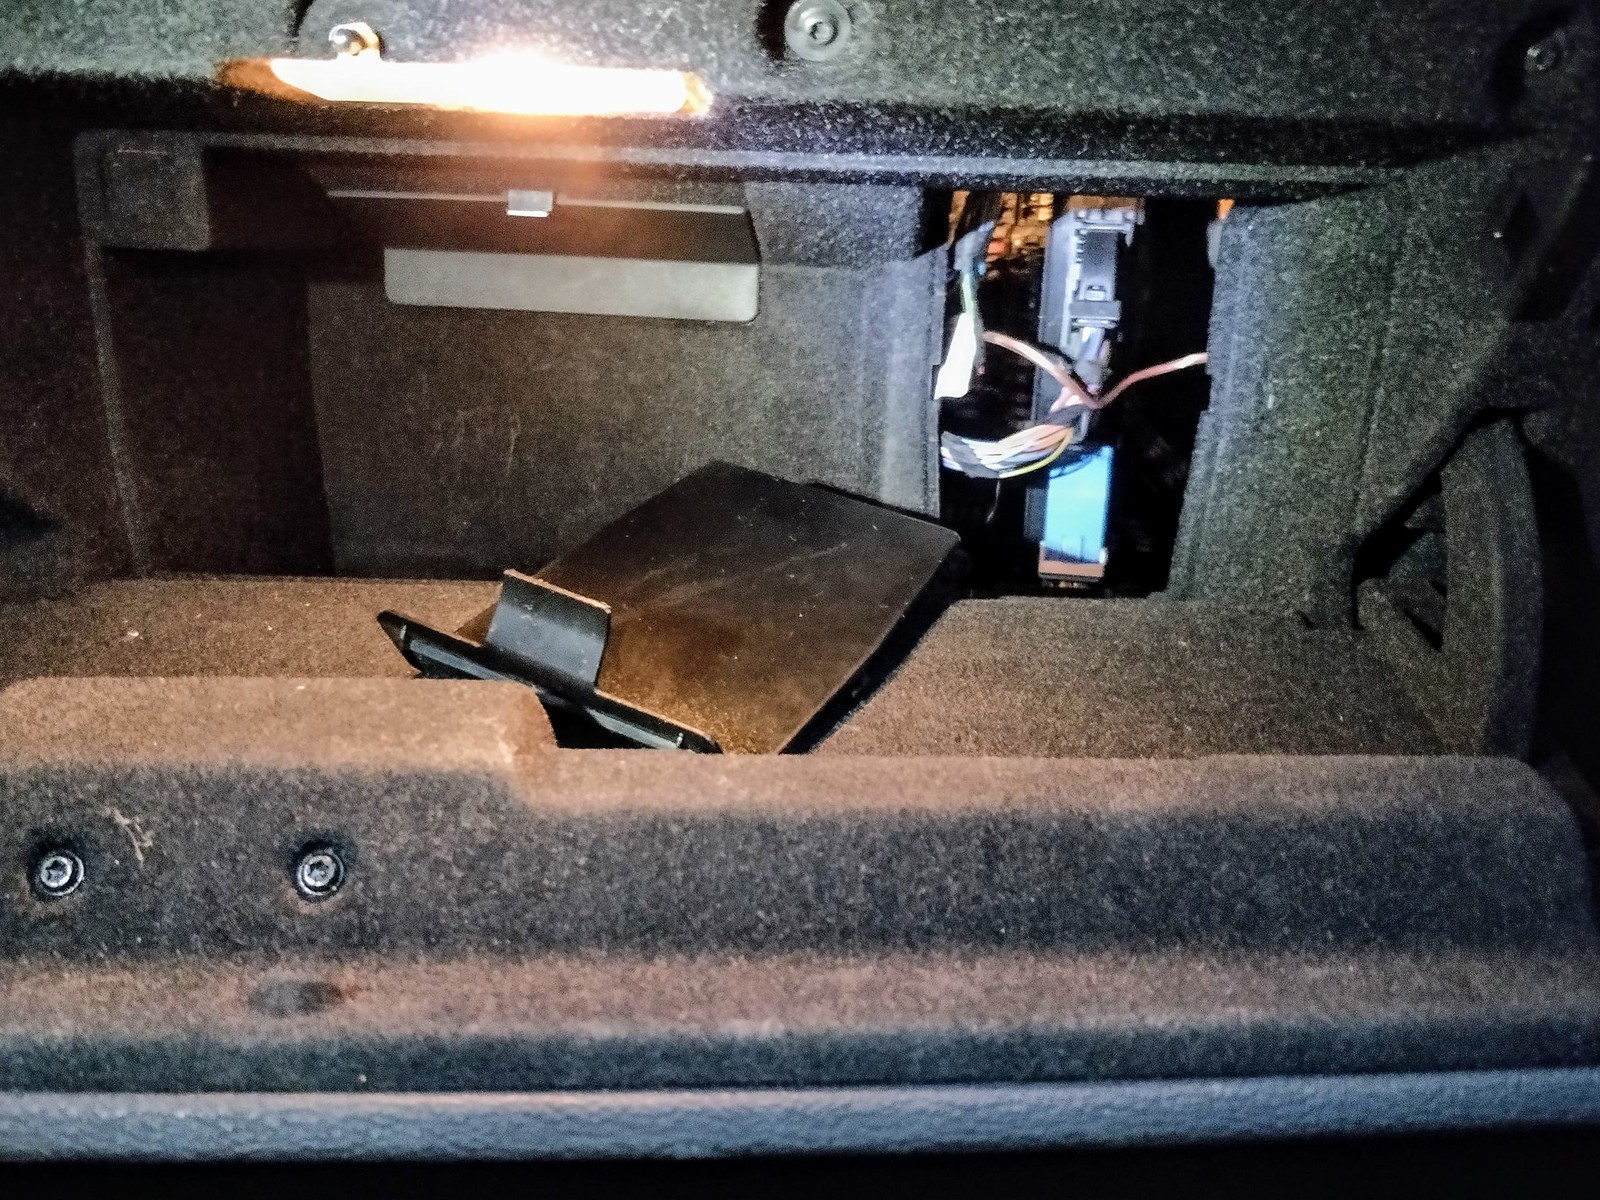 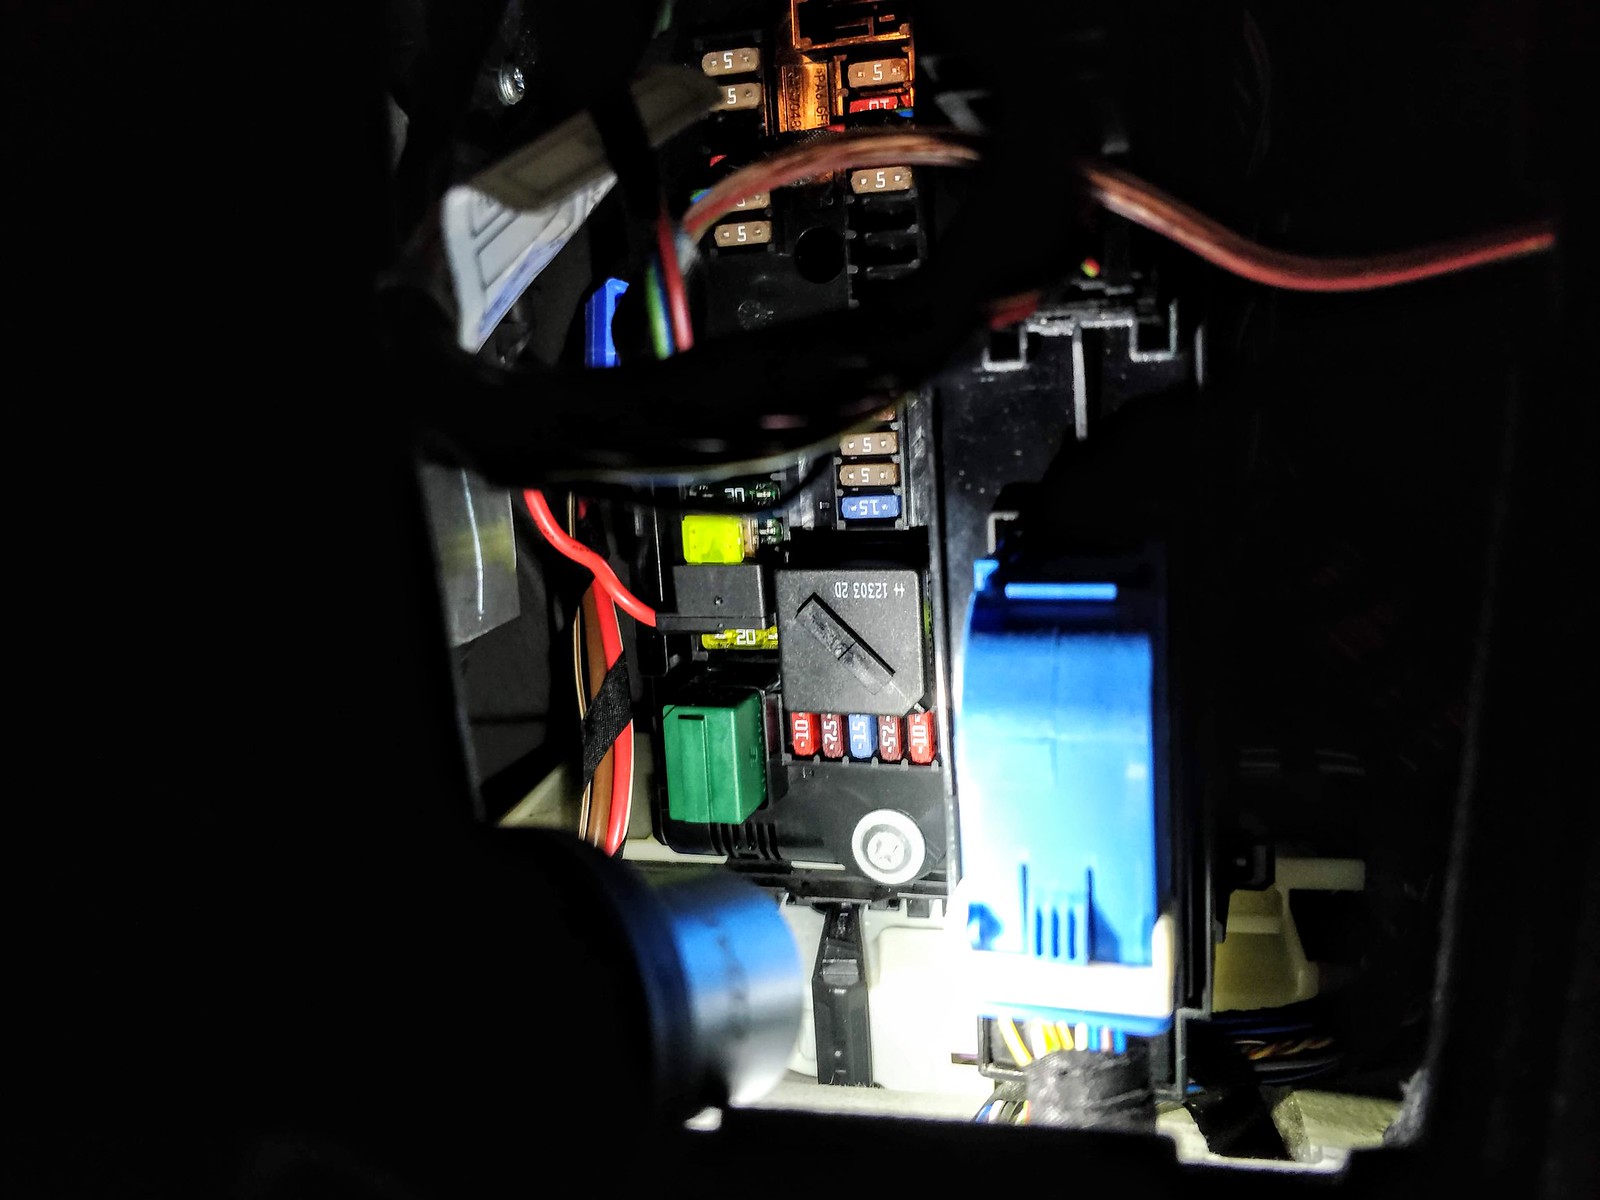 3 - all wires hidden (only about 1.5'' is visible, fine for me). wires get out from the passenger side and running in the A-pillar. I did not remove the pillar, its very easy to squeeze the wire in the windshield/pillar gap  |
|
| 01-18-2019, 08:29 AM | #17 |
|
Private
21
Rep 89
Posts |
Wow! Thank you so much for the explanation and the pictures!
I did look into getting those exact items from Amazon. It seems pretty straight forward. I believe the fuse number you taped into is fuse #54 (also found another thread where you called it out). According to this fuse diagram, fuse #54 looks to be the fuse for the 12V sockets, so this falls in line with what you described. Tucking the wires underneath the trim is the easiest part in this installation. Fuse box looks a little tough to get into. Might help to use a long needle-nose pliers. Thanks for sharing the information. I feel confident enough to complete the install!  Edit: It also looks like regular fuses (not the mini's). Last edited by mike_MAN; 01-18-2019 at 08:46 AM.. |
|
Appreciate
0
|
| 01-18-2019, 09:26 AM | #18 |
|
Lieutenant Colonel
3332
Rep 1,912
Posts |
yeah , Fuse #54 !
Indeed, very hard to reach since its a small access. I managed to get my hand there, but once its there I can barely move and I can't see. I had to repeat the process few times, and I was always dropping the fuse socket. I also used the small fuse, since I had no regular one (socket is for the big one). But small fuse will fit just fine, its just not ''100% oem proof''  |
|
Appreciate
1
pokerface439.50 |
| 05-13-2019, 12:21 AM | #19 | |
|
Private
6
Rep 63
Posts |
Quote:
|
|
|
Appreciate
0
|
| 10-05-2019, 08:48 PM | #20 |
|
Colonel

440
Rep 2,529
Posts |
Fuse 58 (constant) and Fuse 65 (switched) for me. Used Add A Fuse but man its a tight squeeze in there.
Will monitor over the next few days- the battery management function on my Thinkware should hopefully cut off the camera before I come back to a dead battery lol |
|
Appreciate
0
|
| 10-07-2019, 01:56 PM | #21 |
|
Private
21
Rep 89
Posts |
Yeah, i didnt have enough space to put the add-a-fuse in there. I ended up wrapping the wire around one of the fuse terminal... if i were to do this all over again, I would try to use a smaller size add-a-fuse to see if that would work. Its just a really tight area.
As a word of caution: When I routed a secondary rear camera from my front camera as the power source, I routed the wire along the passenger side headliner. For some reason it really messed up my comfort access and remote. I unplugged it from the front camera and all is well. |
|
Appreciate
0
|
| 07-17-2020, 04:29 PM | #22 |
|
ENGIN33R

17
Rep 54
Posts |
This is great. How were you guys able to pass the cable from A-Piller into the area where fusebox is behind glovebox?
I plan to add dashcam within few weeks. |
|
Appreciate
0
|
Post Reply |
| Bookmarks |
|
|


