

Welcome to the ultimate BMW X3 community.
| 11-09-2019, 12:52 PM | #1 |
|
First Lieutenant
 
206
Rep 355
Posts
Drives: a disturbed shark!!!
Join Date: Oct 2005
Location: Miami
iTrader: (0)
Garage List 2023 iX xDrive50 [0.00]
2020 X3 M Competiti ... [0.00] 2017 i3 REx (Sold) [0.00] 2015 X5 xDrive35d ( ... [0.00] 2015 M3 (Sold) [0.00] 2012 X5 xDrive35d ( ... [0.00] 2011 1M (Sold) [10.00] 2006 330xi (Sold) [0.00] 2002 X5 3.0i (Sold) [0.00] 1998 318ti (Sold) [0.00] |
Radar Hardwire (w/ step by step)
Finally got around to hardwiring my Uniden R3 with BlendMount to the fuse box in the passenger footwell. This procedure should work for any windshield mounted radar detector as well. I suggest you wear disposable gloves so you don't have to spend an obscene amount of time cleaning the smudges of your windshield.
You will need: 1) Plastic trim removal tool(s) 2) 10mm hex ratchet 3) Optional - BlendMount BNR-2018 (this model is specific to the G01 X3 with the Uniden R3 but there are many different models depending on your rearview mirror housing, vehicle options & radar detector model) 3) Hardwire kit for you specific detector 4) Regular ATS/ATC fuse tap like this one: https://www.amazon.com/dp/B0146EB8EM..._1zWXDbY7RKSXX ***DISCLAIMER: THIS POST IS FOR INFORMATION ONLY. FOLLOW IT AT YOUR OWN RISK. I AM NOT RESPONSIBLE FOR DAMAGE YOU CAUSE TO YOUR VEHICLE OR IF IT DOES NOT WORK PROPERLY*** Here is the finished product working of a switched fuse. Keep in mind the radar detector will not shut off immediately upon shutting down the car and locking it but rather has a 6 minute delay until it does as this is the way the X3 behaves with the front center console cigarette lighter plug that I tapped into.   The accessory fuse box is located under the glovebox in the passenger's side footwell.  Turn the left and right plastic knobs a quarter of a turn (be careful not to force it so the retaining clips don't jump out)  Then drop down the plastic cover by pulling down and sliding towards you at the same time. You just need to pull it open enough to fit your hands inside (be careful because the footwell LED has a cable attached to it with not a lot of give)  Then remove the 20A ATS fuse #46 (front cigarette lighter plug in the center console) and insert the fuse tap. You should first insert the fuse tap without any fuses installed and check that there is no voltage with the ignition switched on. This is the fuse tap I purchased to insure it can handle the amperage since the mini ATM fuse taps can usually handle a max. of 5A and the cigarette lighter fuses #46 for the front & #47 for the rear use standard size ATS fuses : https://www.amazon.com/dp/B0146EB8EM..._1zWXDbY7RKSXX   If you still get a voltage reading of 12-14 volts you have to reverse the fuse tap b/c you are connected directly to the BUS rail.  Proceed to instal the 20A fuse you removed from the fuse box into the bottom slot of the fuse tap (the slot closest to the metal prongs) and a 2-5A fuse for the radar detector (amperage will vary by manufacturer, I used a 5A for the Uniden R3 because the cable has a secondary 2A inline) into the top slot where the cable comes out from and reinstall into the fuse box in the same orientation as previously tested to insure the line is fused and not direct to the detector.  Switch on the ignition and confirm you have the proper voltage at the terminal (be careful not to let the cable connector touch any metal or it will spark and blow the fuse(s). If you accidentally do, simply replace the fuses along with your underwear and continue.     Connect the positive cable of your radar hardwire kit to the fuse tap terminal.  Remove the 10mm hex nut in front of the fuse box right next to the airbag, connect your negative terminal from the hardwire kit to it and reinstall the 10mm hex nut.  It should look similar to this at this point.  Switch on the ignition again, connect the hardwire plug to the radar detector and confirm it has power. I suggest you turn off, lock the vehicle and wait 6-8 minutes to insure the radar detector powers off before the next step. This is a good time to have your first beer or alcoholic beverage of your choice to prepare you for the next step.  Use a plastic trim tool and carefully (to avoid damaging the trim) pop open the side trim of the glove box.  Pull the side trim towards you and the door at the same time to remove it from the door seal. Be careful not to place it on the center console as the metal clips will scratch the surface. I suggest placing it on the floor mat but be careful not to sit or step on it when you are running the cable.  Run the cable up and into the A pillar and tuck it behind the door seal so the trim doesn't damage it when you reinstall it. 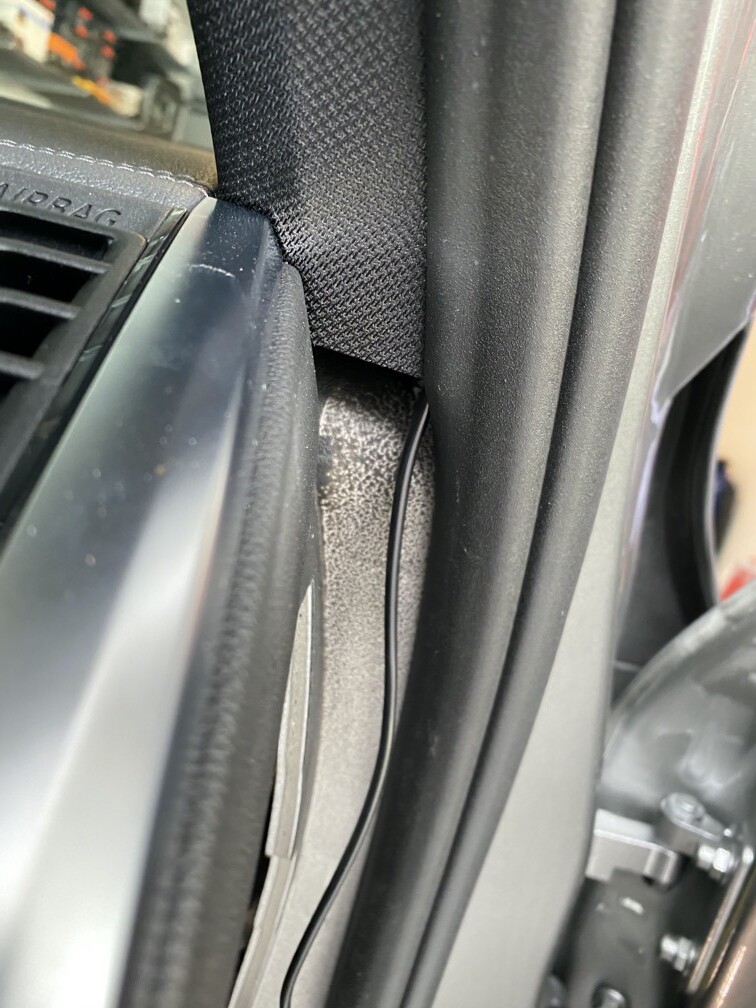 Continue to tuck the cable between the door seal and A pillar.  Make sure the cable sits behind the metal airbag bracket so it won't get ripped out in the unfortunate event of a collision.  Tuck the cable along the windshield trim.  Continue to tuck the cable into the headliner and remove the cover of the housing around the mirror support bracket by gently pulling it down from the front with your fingers.   Before you finish tucking the cable into the headliner, connect it to the radar detector and tuck it in behind the mirror housing trim (be very gentle to avoid damaging the sensors, cameras, etc inside the housing) This way you can wrap the excess cable behind the glove box instead of the headliner.  Continue to very gently tuck the cable around the rearview mirror support housing.   Run the cable behind the retaining clips of the mirror support housing so the cover will not pinch the cable when you reinstall the cover.    Pull the excess cable, wrap it and secure it inside the the side opening of the glove box. Then finish tucking the cable into the headliner and A pillar.  Secure the hardwire kit fuse holder and excess cable so they don't rattle around.  Reinstall the mirror support housing cover by inserting the tabs on the back and pushing the retaining clips on the front & reinstall the glovebox side trim by sliding it under the door seal and then pushing the clips into place. Check that the cable is properly hidden throughout. Sit back, relax and admire your work!!! This is a good time to have your second beer or alcoholic beverage of your choice unless you intend to drive off immediately. I suggest a shower and change of clothes prior to enjoying your newly completed work of art. |
|
Appreciate
13
BMWZ41923.50 Max Well5003.00 j080808129.00 2kaccordocoupe1281.50 FSociety3859.00 Rollo`124.00 robopp2024.50 FineTuningDan0.00 GoFastGoFish126.00 bear1m87.00 X3MCSTV60.50 bowhun2r88.00 Chubbiejones909.50 |
| 11-09-2019, 03:05 PM | #3 | |
|
First Lieutenant
206
Rep 355
Posts
Drives: a disturbed shark!!!
Join Date: Oct 2005
Location: Miami
iTrader: (0)
Garage List 2023 iX xDrive50 [0.00]
2020 X3 M Competiti ... [0.00] 2017 i3 REx (Sold) [0.00] 2015 X5 xDrive35d ( ... [0.00] 2015 M3 (Sold) [0.00] 2012 X5 xDrive35d ( ... [0.00] 2011 1M (Sold) [10.00] 2006 330xi (Sold) [0.00] 2002 X5 3.0i (Sold) [0.00] 1998 318ti (Sold) [0.00] |
Quote:
1) It's a pain in the you know where to find the switched power wire inside the mirror housing because you have to sit in the car for 6-8 minutes (in South Florida without A/C it's suicidal) until the cables are not energized and test each one until you find the correct one. 2) I had a MirrorTap on my i3 that worked well for a couple of years until my old Escort MAX 360 malfunctioned and had a power surge that despite the fuse inside the MirrorTap resulted in a fried module that had to be replaced so I figured the fuse tap was a safer choice. It only took about 30 min. for the whole install and that's because I was taking pictures and figuring it out as I went. |
|
| 11-09-2019, 05:14 PM | #4 |
|
Major
 1310
Rep 1,221
Posts |
Very detailed post and beutiful install. I personally would never hang a radar in such an obvious location. Unfortunatley, they are not 100%, and sooner or later you will be pulled over, law of averages, at which point the cop willl definitely NOT give you a break with that glaring at him. I much prefer an under the dash install with minimal visibility. To each his own, and I complement you on the execution of yours.
|
| 11-10-2019, 10:21 AM | #5 | |
|
First Lieutenant
206
Rep 355
Posts
Drives: a disturbed shark!!!
Join Date: Oct 2005
Location: Miami
iTrader: (0)
Garage List 2023 iX xDrive50 [0.00]
2020 X3 M Competiti ... [0.00] 2017 i3 REx (Sold) [0.00] 2015 X5 xDrive35d ( ... [0.00] 2015 M3 (Sold) [0.00] 2012 X5 xDrive35d ( ... [0.00] 2011 1M (Sold) [10.00] 2006 330xi (Sold) [0.00] 2002 X5 3.0i (Sold) [0.00] 1998 318ti (Sold) [0.00] |
Quote:
I am curious, when you say under the dash I assume you mean a hidden custom install detector like the Escort MAX CI 360 and such??? |
|
|
Appreciate
0
|
| 11-10-2019, 04:03 PM | #6 |
|
Major
1310
Rep 1,221
Posts |
I'm really thinking about apl when I move back to the states after the holidays. Very descreet when mounted under the dash. I don't need anything here atm as the cops don't have radar on their cars and have to setup a warning sign 100 meters prior if they pull over and set up a speed trap. Damn, I'm going to miss driving here!
|
|
Appreciate
1
miula205.50 |
| 11-10-2019, 06:14 PM | #8 | |
|
First Lieutenant
206
Rep 355
Posts
Drives: a disturbed shark!!!
Join Date: Oct 2005
Location: Miami
iTrader: (0)
Garage List 2023 iX xDrive50 [0.00]
2020 X3 M Competiti ... [0.00] 2017 i3 REx (Sold) [0.00] 2015 X5 xDrive35d ( ... [0.00] 2015 M3 (Sold) [0.00] 2012 X5 xDrive35d ( ... [0.00] 2011 1M (Sold) [10.00] 2006 330xi (Sold) [0.00] 2002 X5 3.0i (Sold) [0.00] 1998 318ti (Sold) [0.00] |
Quote:
|
|
|
Appreciate
0
|
| 11-11-2019, 07:22 AM | #10 |
|
Colonel
 5003
Rep 2,627
Posts |
Really appreciate all your time and effort that went into sharing the 'how to' installation, miula. Although I won't be installing radar hardwire in our X3MC, I always appreciate folks trying to help others out in the forums.
 |
|
Appreciate
1
miula205.50 |
| 11-11-2019, 11:53 AM | #11 | |
|
First Lieutenant
206
Rep 355
Posts
Drives: a disturbed shark!!!
Join Date: Oct 2005
Location: Miami
iTrader: (0)
Garage List 2023 iX xDrive50 [0.00]
2020 X3 M Competiti ... [0.00] 2017 i3 REx (Sold) [0.00] 2015 X5 xDrive35d ( ... [0.00] 2015 M3 (Sold) [0.00] 2012 X5 xDrive35d ( ... [0.00] 2011 1M (Sold) [10.00] 2006 330xi (Sold) [0.00] 2002 X5 3.0i (Sold) [0.00] 1998 318ti (Sold) [0.00] |
Quote:
 I do have to admit that even though my Uniden R3 has saved me from a couple of close calls, I have gotten a lot more "saves" from Waze which now with wireless CarPlay is incredibly easy to use with no mods at all. Now I just have to figure out the full screen Apple CarPlay situation  |
|
|
Appreciate
1
Max Well5003.00 |
| 11-19-2019, 02:25 PM | #14 | |
|
First Lieutenant
206
Rep 355
Posts
Drives: a disturbed shark!!!
Join Date: Oct 2005
Location: Miami
iTrader: (0)
Garage List 2023 iX xDrive50 [0.00]
2020 X3 M Competiti ... [0.00] 2017 i3 REx (Sold) [0.00] 2015 X5 xDrive35d ( ... [0.00] 2015 M3 (Sold) [0.00] 2012 X5 xDrive35d ( ... [0.00] 2011 1M (Sold) [10.00] 2006 330xi (Sold) [0.00] 2002 X5 3.0i (Sold) [0.00] 1998 318ti (Sold) [0.00] |
Quote:
|
|
|
Appreciate
1
proadventure1.50 |
| 11-19-2019, 06:12 PM | #15 |
|
Brigadier General
 

1282
Rep 4,703
Posts |
After you pull back the A pillar trim you will see a wire loom running the length of the A pillar. It's between the metal bracket and windshield.
Tie your power cable with that loom. Two or three small zip ties is all you need. Completely out of the way of the airbag and won't make any rattle noises. |
|
Appreciate
1
miula205.50 |
| 12-31-2019, 02:20 PM | #17 | |
|
Second Lieutenant
218
Rep 210
Posts |
Quote:
__________________
2020 X3MC, 2019 M2C
'14 F-150 Tremor, '99 Mustang Turbo |
|
|
Appreciate
1
knepsterd379.50 |
| 12-31-2019, 04:37 PM | #18 | ||
|
Major
380
Rep 1,168
Posts |
Quote:
|
||
|
Appreciate
0
|
| 12-31-2019, 06:00 PM | #19 | |||
|
Second Lieutenant
218
Rep 210
Posts |
Quote:
Use a wiggle/downward force to pop the mirror off. 1st connector to the passenger side is ground, 4th one from left is 12v. Don't remember the colors.
__________________
2020 X3MC, 2019 M2C
'14 F-150 Tremor, '99 Mustang Turbo |
|||
|
Appreciate
0
|
| 01-01-2020, 12:34 AM | #20 | |
|
Major General
608
Rep 5,446
Posts |
Quote:
__________________
Fore Sale Rare 6 speed manual X3 3.oi silver over grey. PM me
|
|
|
Appreciate
0
|
| 01-01-2020, 10:18 AM | #21 | ||
|
Major
380
Rep 1,168
Posts |
Quote:
|
||
|
Appreciate
0
|
| 01-01-2020, 11:27 AM | #22 | |
|
Major General
608
Rep 5,446
Posts |
Quote:
__________________
Fore Sale Rare 6 speed manual X3 3.oi silver over grey. PM me
|
|
|
Appreciate
0
|
Post Reply |
| Bookmarks |
| Thread Tools | Search this Thread |
|
|


