

Welcome to the ultimate BMW X3 community.
| 07-06-2020, 03:25 PM | #1 |
|
Lieutenant Colonel
 

523
Rep 1,707
Posts |
Okay we're back again for another DIY!
The patient is a 2012 BMW X3 35i with 81K miles. I have chosen to go with Redline 75w-85, which is equivalent to OEM Part # 83222413511. Link to fluid here -------> https://www.ecstuning.com/b-redline-...art/50104~red/ NOTE: This same fluid can also be used for the rear differential!    Before you start this DIY make sure you have a nice fluid transfer pump. The one I used can be viewed here: https://www.ecstuning.com/b-schwaben.../022253sch01a/ Here is a parts list of everything you'll need for this DIY: - 1 quart of front differential fluid - fluid transfer pump - ratchet - extensions - 8mm socket - 10mm socket - 14mm hex socket The two following pictures are the jacking points as described by BMW. The first picture shows the jacking points, and the second picture is the jack pads underneath the vehicle. Use these as a guide to properly raise and support your X3. NOTE: Be sure to make sure the car is level once it's raised into the air. This will allow for the proper level of fluid to be put back into the vehicle.    Once the vehicle is up in the air, grab your 8mm and 10mm sockets and go to town on the lower engine cover underneath the vehicle.  From under the vehicle looking up, here is the front differential. You can easily see the drain bolt on the bottom.   It is a small window looking inboard from the LF wheel to locate the fill bolt. 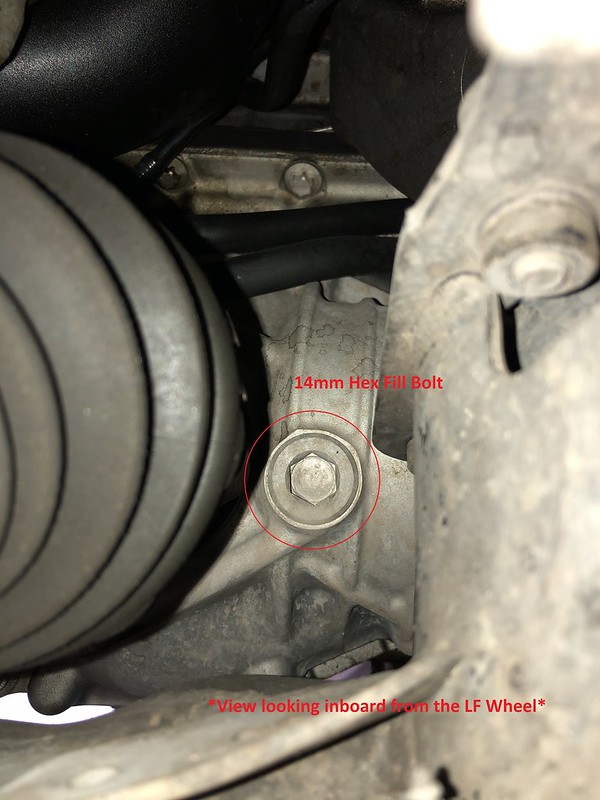 Okay let's get to work! Grab your 14mm hex socket, a 6 inch extension (roughly) and your ratchet. Break loose the fill bolt FIRST before you do anything else. We would hate to remove the drain bolt first, and then have an issue removing the fill bolt. Know what I mean? Again, this view is looking inboard from the LF wheel. Make sure you have a drain pan ready to catch any fluid that may come out once the fill bolt is removed.  This view is from the ground looking up at the fill bolt with my socket already in place.  Once the fill bolt is removed, let's go ahead and remove the drain bolt on the bottom of the front differential. Again, make sure to have a drain pan ready to catch the old diff oil. 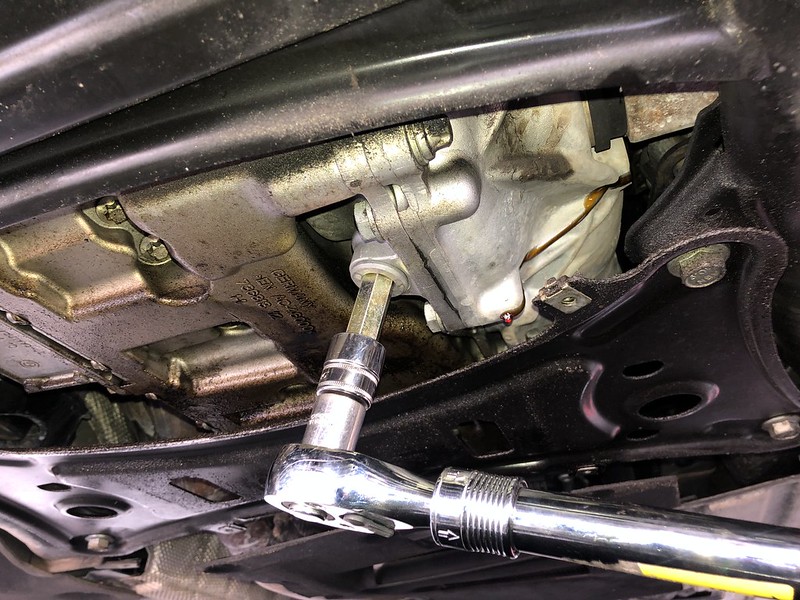 Old fluid on its way out after 81k miles!   From here it should be self explanatory. Once the old fluid is done draining, reinstall the drain bolt. You can also choose to buy new bolts if you wish. I just reused what was already there. Torque to 60Nm. After the drain bolt is torqued properly, go ahead and pump the new fluid in until it starts to come out of the fill hole. Since the wheels will be off of the ground, go ahead and spin the wheels a bit to get the new fluid into all the crevices of the front diff. That could give you a bit more room for new fluid. Then reinstall the fill bolt and torque to 60Nm. Clean up, and reinstall the lower engine cover and celebrate! Front diff fluid change complete! 
__________________
|
|
Appreciate
10
Marty in NY3439.00 joshaguirre13.00 tracer bullet3444.00 Wgosma828.50 evilchargerfan280.50 Bufalo124.00 one9kilo20.50 littleob21.50 scostu1619.50 Cariboospeed8.50 |
| 07-07-2020, 10:35 AM | #3 |
|
Brigadier General

3444
Rep 4,102
Posts |
Thanks for these! I'm a decent DIYer but it's so nice to have an example to look at first to know what you're getting into, get tools ready and see if I'm missing anything needed, give the wife an estimate of how long I'll be in the garage, and so on.
Really appreciate it! |
|
Appreciate
0
|
| 07-07-2020, 04:45 PM | #4 | |
|
Lieutenant

281
Rep 595
Posts
Drives: 2012 F25 (N55), 2014 I01 (REX)
Join Date: Oct 2010
Location: San Diego / Menifee
|
Really Really Really appreciate these tutorials. prior to you making these, most of what i've looked up on the matter had no pictures, at all
 Quote:
I looked at Chris's guide for the front diff, and I figured ... "okay I'll tell the mrs an hour this sat" and looking at Chris's guide (in another thread) for the rear diff, I can tell her another hour this sunday. |
|
|
Appreciate
0
|
| 07-11-2020, 02:06 PM | #5 |
|
Captain

283
Rep 888
Posts
Drives: 08 135i M Sport 6MT, 15 X3 35i
Join Date: Feb 2013
Location: Edmonton
|
Fantastic DIY, thanks for posting!
__________________
2015 Cosmic Blue Metallic Wrapped X3 35i ///M Sport Full 3M Vinyl Wrap | Flat Black Grilles  |
|
Appreciate
0
|
| 07-20-2020, 03:29 PM | #6 |
|
Lieutenant
281
Rep 595
Posts
Drives: 2012 F25 (N55), 2014 I01 (REX)
Join Date: Oct 2010
Location: San Diego / Menifee
|
Finally did my front diff, cant thank EndOfAnEra enough. I'll share some pics and my experience
my pump and extra hose for it. plan is to clean pump prior to doing another fluid, and trashing 12 inch section of hose and use new hose for the next fluid type  view from the front of car. per the op, will focus attn towards front/drivers side wheel  fill port (always a good idea to loosen this first)  drain port  loosening the fill port  loosening the drain port  about 500ml collected. yuck  replaced all my plugs. a little overkill, could easily skip this  torqued drain plug to 60 nm  mityvac pump could hold about 200 ml. so I had to do this 2 and a half times  pump in new fluid slowly. once excess flows out, stop pumping ... wait for overflow to stop. install plug and torque to 60 nm  |
|
Appreciate
5
|
| 09-08-2020, 07:49 PM | #7 |
|
Second Lieutenant
124
Rep 290
Posts
Drives: 2009 328i
Join Date: Dec 2011
Location: Harrisburg, PA
|
I found tonight that with a decent bit of hose you can fill the front diff from the top, pouring slowly until fluid starts to run out of the plug. I have some fluid pumps, but man I hate using fluid pumps. I am doing the transmission, xfer case and rear diff this coming weekend, so I'll have plenty of time to use fluid pumps...
|
|
Appreciate
1
Cariboospeed8.50 |
| 09-09-2020, 12:44 AM | #8 |
|
Enlisted Member

21
Rep 32
Posts |
Nice write up. I just did my front, rear diff and transfer case fluids. Interesting though.. I used Redline 75w90 for both front and rear diff. From my research online, it doesn't seem to make a difference so I hope it's OK.
For the front diff, if you have the front left tire off you can actually sit in the pocket of the wheel well and pump fluid just sitting there. Makes it easier than laying on the ground. I didn't think to rotate the wheels so make more room for fluids. Great advice there. I'll have to do that next time. Last edited by one9kilo; 09-09-2020 at 12:45 AM.. Reason: Grammar |
|
Appreciate
0
|
| 11-02-2020, 03:10 PM | #9 |
|
X5 Newbie
12
Rep 27
Posts |
Very nice write up, thank you EndOfAnEra and Evilchargerfan for the effort of taken pics and posting, getting ready to do this along with Tranny/Transer case fluids and always gives more confidence to see photos of the DIY before hand.
__________________
2022 X5 SDrive40i 45K miles - New Baby
2011 X3 xdrive28i 158K miles - Gave to Family - Still Runs 2004 325ic 215K miles - SOLD 2002 325i 230K miles - RIP 2024 |
|
Appreciate
2
evilchargerfan280.50 EndOfAnEra523.00 |
| 11-02-2020, 03:33 PM | #10 | |
|
Lieutenant
281
Rep 595
Posts
Drives: 2012 F25 (N55), 2014 I01 (REX)
Join Date: Oct 2010
Location: San Diego / Menifee
|
Quote:
I legit waited on Chris to do this, before I got anywhere near the car, lol! But yea, his DIY made it so super crazy smooth. Going in with confidence was such a good feeling. GL! |
|
|
Appreciate
0
|
| 11-02-2020, 04:37 PM | #11 |
|
Private
 20
Rep 51
Posts |
Thanks for the write-up. Bought one quart for the front differential, had to drain it when i replaced my N20, a little bit was left over in the bottle. Really easy to do, old fluid was horrible looking. I appreciate the help.
  Lifetime fluid? Questionable... 72k miles and it looked like this |
|
Appreciate
0
|
| 11-29-2020, 07:23 PM | #12 |
|
Lieutenant
177
Rep 591
Posts |
it looks like FCP recommends 75W90 Redline or Limo. What's your take on 75W90 vs 75W85? What's the difference going from hypoid vs full synthetic? (it seems RealOEM is saying OE using hypoid instead of full synthetic)
|
|
Appreciate
0
|
Post Reply |
| Bookmarks |
| Thread Tools | Search this Thread |
|
|


